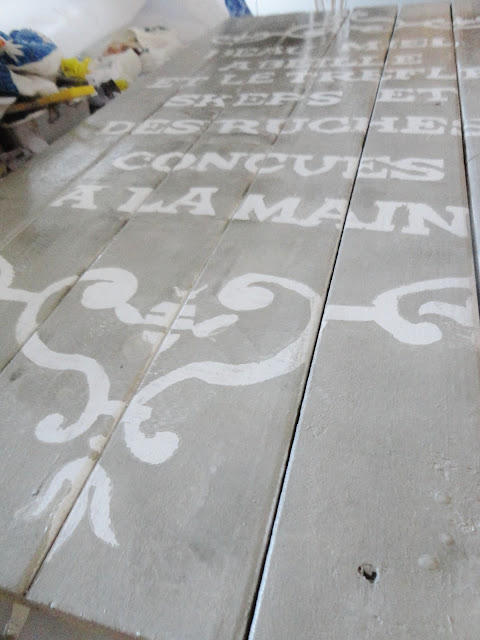
So here we have a little project I completed aaaaaaaages ago! (No dramatification required!).
Literally, the photos have been sitting on my computer for months now! So I decided since I have a day off (and managed to hyper-extended my ankle last night so limiting me from doing much else), I may as well actually post them!
The story goes that I wanted to make a piece of art to hang on the wall in my spare bedroom which would fit with the 'au natural' theme I have been trying to create. I pretty much knew I wanted to go with wood as my main material since its such an obvious choice:
Natural - check.
Easy to get - check.
Easy to work with - check.
I had looked around on Pintrest and various other sites for inspiration and found many examples of stencilling to create dramatic decor pieces using personal/fun/inspiring messages - I knew I had found myself a winning idea. Now all I had to do was create a canvas from wood and find some cool message to slap on top of it. Simple, no?
To start with I trotted off up to Bunnings to get myself some wood and found some great wooden pickets (I think from memory they were 1.7m) for just a couple of dollars each - score!
Once I had strategically fitted them into my little car (this took a little work... they were a lot longer than they had initially looked) I got them home and decided what size I wanted my piece to be. To fit the wall I was wanting to decorate I decided a tall, rectangular size would fit it best to fill the space without making it look cluttered.
Having decided on my measurements I set about cutting my pickets to length. I started off using my jigsaw cutter but since the pickets were so small I quickly scratched that idea and took up the handsaw instead - much quicker and easier and also gave me a more controlled, and therefor straighter, cut.
Once I had cut the pieces to length, I lined them up next to each other to form my rectangle shape and measured the width. This would give me the length I needed to cut two extra pieces to act as support beams and hold the whole thing together!
Next up it was simple a case of using some wood glue and screws to attach my wood posts to the two support beams. Make sure you get a screw into every post to make sure the entire structure is sound!
 |
| Line up all your pieces before you start gluing and screwing so that you know exactly where to drill! |
 |
Screw every plank in securely! |
And voila! One wooden canvas. Give it a quick sanding to remove and sharp corners and to make sure your final result will be smooth and then its time to pull out the paint!
 |
| My fingernails were feeling particularly colourful that week! |

 |
| Undercoat finished! |
Next up you need to create your stencil. There are fancy machines and places which will do this for you quickly but I didn't really want to fork out to much money on this project, so I made a trip to the shops and picked up a roll of clear contact paper (yup, the kind you cover your schoolbooks with!).
I found an image online which I liked, though I'm still not entirely sure what it says. Something in French about bees or something... anyway it had the look I was after and that was good enough for me! So I printed out the image and used the photocopier at uni to blow it up to the actual size I wanted.
After that I simply traced the design onto the contact sheet (holding them up against a window on a sunny day really helped me to see through the contact to the pattern on the sheet below!) and then cut out the shapes and letters on the contact. This really was the most tedious and time consuming part of the whole thing!
 |
| My pattern traced onto my contact sheet using permanent marker |
Once this is done simple peel off the paper backing on the contact paper, stick the design as you wish onto the painted wooden board and give the whole thing a coat in your second colour of paint. I did notice that the contact sometimes came unstuck from the wood so just be careful when your painting over the top of them!

 |
| Apply the second coat over the stencil |
Last step, peel off the contact stencils and BOOM!

 |
| Peel away the stencil |
One piece of personal art fit for any spare bedroom... or any other room for that matter!
I did give the piece a light sanding once the final coat of paint was dry just to 'rustic' it up a bit and as yet it is still sitting in the corner of the room waiting for me to hang it up (currently my growing stash of paints and fabrics are taking up it's eventual home!).
However, overall I'm pretty happy with the final look. Its quite imperfect which suits the natural, rugged/rustic look I was going for and, most importantly, it was budget friendly! the whole thing cost just over $10! That's a win in my book!
Hopefully this post has inspired you to create your own unique wall art and has shown you what to do (or maybe what NOT to do depending on what you thought of the result!) to get it.
xxoo


No comments:
Post a Comment