Showing posts with label vanilla cupcakes.. Show all posts

Saturday, 1 November 2014

Halloween Cupcakes


Let's be real for a minute. A cupcake by itself is a perfectly good thing, but when you slap a witches hat, pumpkin or itty-bitty ghost on top you know you're in for a good time!

As most of the population would be aware another Halloween has just passed on by and this year I was requested to make some special cupcakes for when the neighbourhood kids came by. Being the obliging person that I am I said yes and so I thought I would share with you a few very basic ways you can decorate your cupcakes, be it for the next Halloween or simply because you have free will and can do what ever you very well please, official calendar dates be damned!  


1. Terrifying Tombstones


Super easy and quick! Just crush up some chocolate biscuits in a food processor and dip in an iced cupcake. Grab some grey fondant or gumpaste (or I used black and then painted it with grey lustre dust) and shape it into a flat tombstone then use a toothpick or something similar to carve out an 'RIP'. Stick it into the crumbed icing and you're done! 


If you're feeling fancy you could also go a step further and make a fondant hand coming out of the ground...  Just a thought for the gruesome minded...


2. Ghoulish Ghosts


As adorable as they are, these little ghosties are actually really simple! Simply take one iced cupcake, stick an Eskimo Snowball on top (if you don't know what they are check them out here - basically they are a chocolate and coconut covered marshmallow which give the ghosts their shape!). Roll out some plain white fondant/gumpaste and cut a circle out for each cupcake. Drape it over top of the snowball and paint on some little eyes and a mouth with some black food colouring. Bada-bing bada-boom! Boo!


3. Party Time Pumpkins 


 Got some fondant or gumpaste and food colouring? Then your set! 
Simply roll your fondant into small balls and use the back of a knife, a toothpick or whatever other tools you can find to press some grooves around the sides of the balls and press gently into the top of the ball to make them less spherical and more 'pumpkin-like'. Let them dry and harden a little (if you have the time, I didn't and they still worked out fine!) and then use some orange food colouring diluted with a drop of water (I didn't have orange so mixed some yellow and red) to paint them the perfect shade of Halloween spirit! Take a small amount of brown fondant, roll it into a short snake with your fingers and stick it in the top to make a stem. That's it! Now just pop them on top of your iced cupcakes!


4. Boo! and also a bit of Ahhh! 


Want to express your terror in painted message form? Simply grab some white fondant/gumpaste, roll it flat and cut out a small circle for each cupcake. Pinch a 'corner' of the circle (yes I am aware circles don't have corners, don't get sassy with me!) to make it into more of a speechbubble shape and let it dry out. Then go in with some plain black food colouring and a paintbrush and write whatever scary message your heart desires! No message is to generic!  


5. Jack Skull-etons


See what I did there? Yeah you do!

I love Tim Burton films and 'The Nightmare Before Christmas' is a classic! Thus we have the cupcake dedicated to Jack Skeleton, King of Halloween. 

Like a number of the others really, grab some white fondant or gumpaste, roll it flat and cut out circles bit enough to mostly cover the top of your iced cupcake. Let it dry out hard (otherwise it will sag when sitting on the moist icing! Be warned!) and then paint on a your Jack faces in a variety of expressions using black food colouring. Stick it on top of your iced cupcakes and there you have it, a hoard of adorable Jack Skull-etons! 


6. Wicked Witch's Hats 


Is there anything more 'Halloween-y' than a witch? Possibly, but this is neither the time nor place for such a debate. Instead just be satisfied adorning your cupcakes with their cliche head wear!

Take a small piece of black fondant and roll it into a short sausage, tapering one end so that it is much thinner than the other. Use your fingers to pinch the fat end to create a flat brim of the hat and then slightly bend the thin end to give the hat a little more shape. Roll a tiny piece of yellow (or other colour) fondant into a very thin snake and form it into a square buckle to stick on the front of your witch's hat. Stick that baby on top to perfectly accessorise your cupcake! 


And there you have it! 


Hopefully you find these tips useful the next time Halloween rolls around and have fun freaking out and/or delighting your friends, family or neighbourhood juveniles! 


Friday, 18 April 2014

Just Peachy!


So it has been a while between posts... apologies for my laziness!

But what better way to get back into the swing of things than with a peach- coloured feast of tiered cake, macarons and cupcakes!

And flowers. Don't forget the flowers.

Wednesday, 6 November 2013

Calling All Halloweenies!


Better late than never!


Apologies for the delay but I have had so much on my plate this last week I'm only just getting around to sharing how I celebrated that time of the year when kids are encouraged to stuff their faces with lollies solicited from total strangers. Good old Halloween!

 If like me you live in Australia, you will know how controversial the celebration of Halloween is. Many people refuse to celebrate, arguing that it is an American tradition (though if you actually take 2 seconds to open google you will know that it actually has Celtic roots...) and heaven forbid we actually cave 'Americanization.' Personally I don't really understand how celebrating one night a year is a step too far when brands such as Coca-Cola, Pepsi, McDonald's and even Oprah bombard our lives every day of the year... Each to their own I suppose.

Debate aside, this year by special request I whipped up a batch of wickedly good (*baddum tch!*) Halloween cupcakes to give out to the neighbourhood kids and they went down a treat.

Get it? As in 'trick or treat'?? ... Ok I'll stop now... 


Halloween Ghost Cupcakes


* This cupcake recipes comes from Planet Cake and is my go to for deliciousness!*


For the Cupcakes:


175g butter, softened
165g caster sugar
1 tsp vanilla extract
2 eggs
110g self raising flour
150g plain flour
160ml  buttermilk


Pre-heat the oven to 180 degrees Celcius and line a muffin tray with 12 cupcake cases (bonus points if they are Halloween themed!)   

In an electric mixer beat the butter, vanilla and sugar until pale and fluffy then beat in the eggs one at a time. 

Stir in flours and buttermilk and then beat on a low speed until just combined. Spoon the batter into the cupcake liners and bake for 20 minutes or until lightly golden and cooked through when tested with a skewer. 


For the Decorations:


125g butter, softened
500g icing sugar
1 tbsp milk
1 tsp vanilla essence

12 marshmallow Eskimo snowballs (these babies right here)
White fondant


Beat the butter until pale and then gradually beat in the icing sugar until the mixture is light and fluffy. Whilst beating add the milk  and vanilla until totally combined.

Spoon a small amount of the buttercream onto each cupcake and place a marshmallow snowball on top, pressing it into the icing so that it is secure.

Roll out the fondant until about 5mm thick and cut out 12 circles measuring about 10cm across. On each circle cut out two small eye holes  about 2 cm down from the centre.

Cover each cupcake with a fondant circle and use your fingers to slightly ruffle the bottom to give your ghosts the appearance that they are floating 


Voila! One batch of freaking adorable ghost cupcakes!


Thursday, 2 May 2013

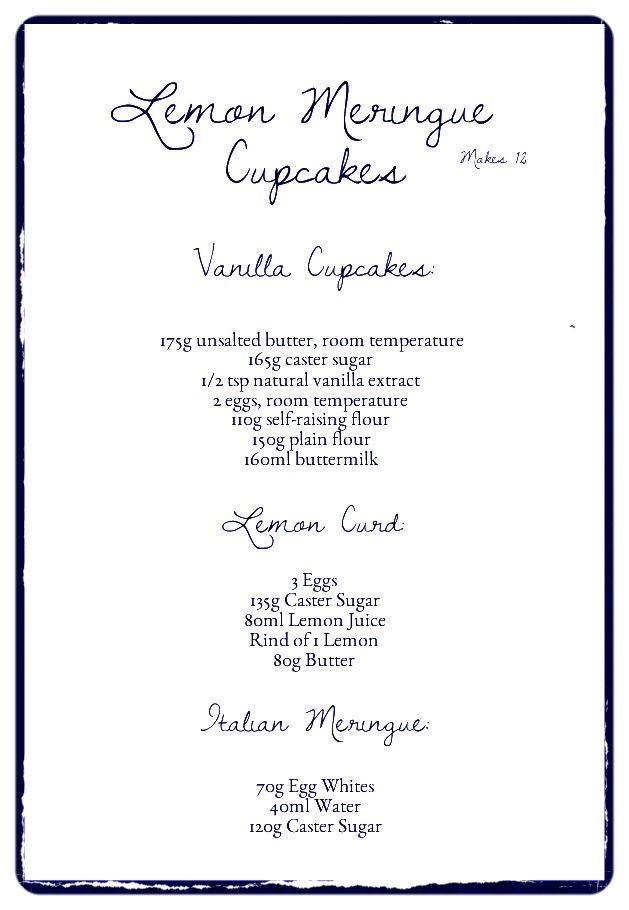
Lemon Meringue Cupcakes


Over the past couple of months I have been in a bit of a funk. A cooking funk specifically.

Whilst I love food and cooking, recently I have been trying to watch my weight and tone up a bit which has caused my experimenting in the kitchen to dry up. Don't get me wrong, there are PLENTY of creative and delicious ways to cook healthy meals, but lately I just seemed to lack the energy or desire to do anything cooking related.

Was the cooking dream over?! Was this interest in cooking I had earlier considered an integral part of myself simply a fad I was to 'get over' and become one of those people content to live off Lean Cuisine?!

Apparently not.

The other day my Mum came to me and told me that she had been thinking about the future cake shop/ cafe we are going to co-own 'one day' (still haven't figured out the who, what, when and where of that plan yet!). Her latest exciting plan for the store - taking traditional desserts and transforming them into cupcakes.

Creme brulees, pies, tiramisu, black forest... the list she reeled off went on and I could tell she had been kept awake at night going over her favourite dishes in her head! Whilst the concept is not new (cupcakes have become the choice vessels for a great number of traditional dish reinventions!) I did think it would be fun to make my own attempt at these recreations in my own way.

And with that the flame of cupcake desire was once again ignited!

So, I present to you the first of what should hopefully be many cupcake reinventions - the Lemon Meringue Cupcake!


These cakes are the perfect mix of sweetness and that tarty ZING only lemon can provide, but more importantly they are also incredibly simple to make! 


A couple of notes you may want to take on board when making these though: 


1. The Cupcake Base  

You can use another recipe for the cupcake batter if you have a 'special secret recipe' that you love or which was passed to you by a beloved elderly relative on their death bed. The one I use actually comes from the Planet Cake Cupcakes cookbook and is a little denser and has an almost 'shortbready' taste than most cupcakes. I love using this recipe and thought it was perfect for this cupcake since it more closely resembles the buttery tart shell of a traditional lemon meringue pie! 


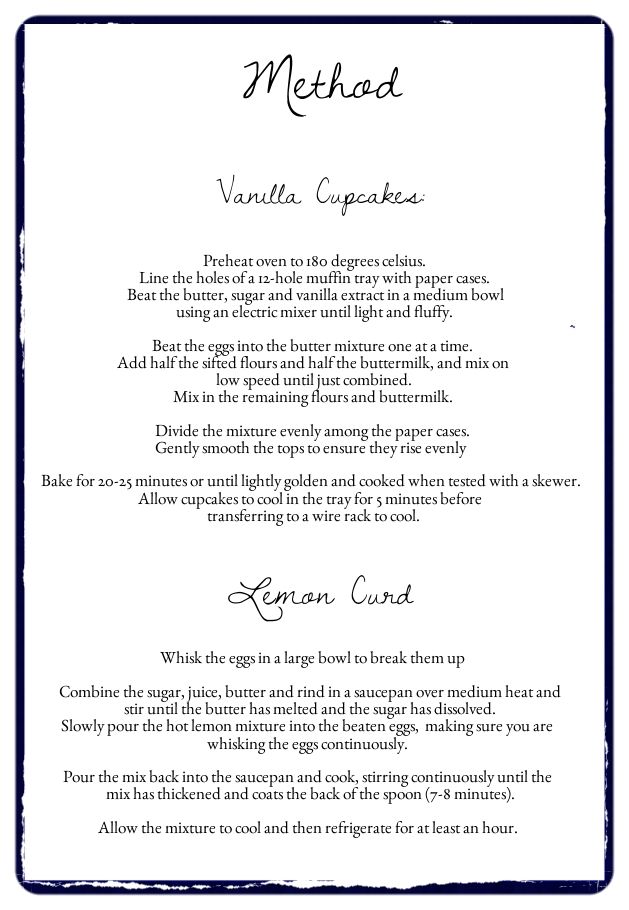
2. Putting A Hole in the Cupcake

An apple corer can be very useful for this...


3. Making the Lemon Curd 


When making the curd be very sure that you don't stop whisking the eggs when adding the lemon mixture and don't add it to quickly or you will risk scrambling your eggs. A delicious twist with toast for breakfast perhaps, but NOT what you want here!


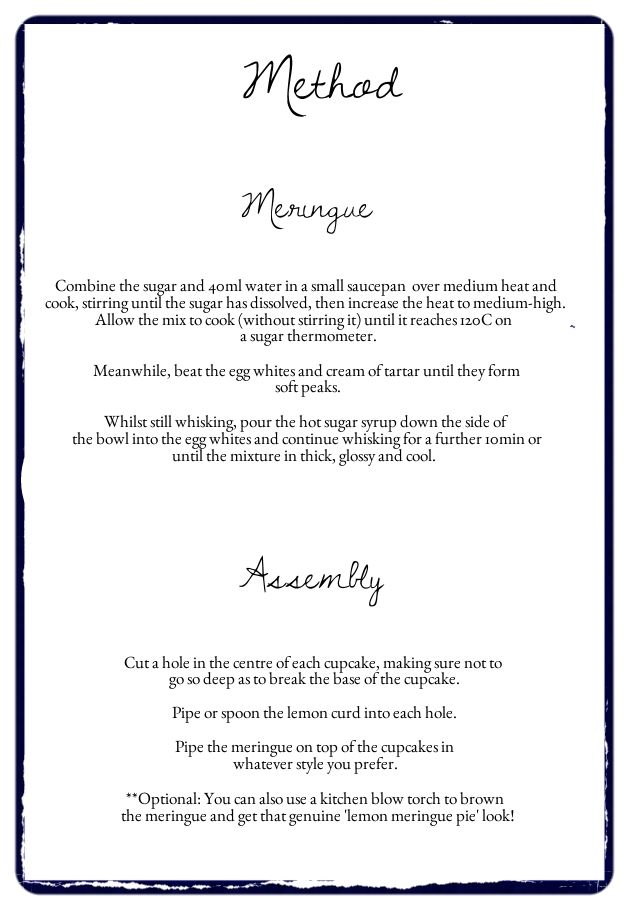
4. Blow torching the Cupcakes

Using a chef's blowtorch to finish the cupcakes just gives them that little bit of extra eye appeal as well as an extra (though very subtle) layer of flavour. HOWEVER, when making these I didn't anticipate that I would be torching them because I thought I was out of gas for my torch. Luckily for me I found an extra bottle tucked away in the back of my pantry. Unluckily for me I had already made the cupcakes is a high-backed paper case which catches fire extremely easily.

Lesson to self - unless you want bits of your paper casing to create a sprinkle of ash on your serving plate, DON'T USE THESE PAPER LINERS.


A little blow torching to give them that little extra bit of oomph!


Enjoy! xo