Showing posts with label vegetarian. Show all posts

Sunday, 29 July 2018

Vegan Chocolate Cheesecake


I'm back from the dead and come bearing cheesecake! 

Decadent, rich, vegan cheesecake!


This recipe actually comes from taste.com.au and I was amazed with how well it turned out. Even the two non-vegans I served it to loved it and commented on how smooth and creamy it was, ironic for something with no cream whatsoever. 

As a side note, the fact that recipes like this are now featured on mainstream websites like Taste.com just goes to show how popular plant-based eating has become in recent years and it continues to blow my mind!

If you're after a simple recipe that even the most discerning dessert fans will love, give this one a shot!


For the Base:

1/2 cup rolled oats
1/4 cup coconut sugar
3/4 cup almond or hazelnut meal
1/2 tsp ground cinnamon
Pinch of sea salt
1/3 cup coconut oil, melted

For the Filling:

600g silken tofu
2 tsp vanilla extract
3/4 cup coconut sugar
2 tbsp cacao
250g dark chocolate (dairy free)

Fresh berries to serve.


Method:

Preheat the oven to 180C/160C fan forced. Release the base of a 20cm (base measurement) springform pan and invert. Spray with oil. Line the base with baking paper, allowing a 4cm overhang. Secure the base, paper side up, back in the pan. Grease the side of the pan and line with baking paper. 

For the base, process oats and sugar until finely chopped. Add the hazelnut meal, cinnamon and salt. Pulse to combine. Add oil and process until mixture comes together. Press mixture into base of prepared pan. Bake for 20 minutes or until golden. Set aside to cool. 

Reduce oven to 170C/150C fan forced. Place tofu and vanilla in the bowl of a food processor and process until smooth. Add sugar and cacao. Process until smooth. Add all the melted chocolate and process, scraping down side with a spatula, until combined. Spoon over prepared base. Smooth surface. Bake for 40 minutes or until just firm (mixture will still be soft in centre). Turn off oven and leave to cool in oven with door ajar. Cover and place in the fridge for 4 hours or overnight to chill. Dust with extra cacao. Serve with raspberries.


Monday, 5 March 2018

Grilled Peaches with Honey and Coconut Cream


 Quick and easy dessert (or breakfast?) option for when you need to hit that sweet craving without going over the top!


Ingredients: 

  • 1 x Peach, halved and pit removed
  • Vegan butter substitute
  • Honey (or maple syrup)
  • Coconut cream, chilled
  • Blueberries 
  • Chopped peanuts

Directions: 

  1. Melt the butter in a grill pan and add the peaches, cut side facing down. 
  2. Cook the peaches for approx. 5 mimutes or until the cut side is caramalised and browned. 
  3. Top the peaches with a drizzle of honey (or maple syrup), a generous dollup of the chilled coconut cream and sprinkle with the blueberries and nuts - or whichever other toppings you prefer.
  4. Enjoy!

Sunday, 27 March 2016

ABC(LG) Juice


I have never been on a juice 'cleanse'/detox.

I have no current plans to undertake a juice cleanse/detox in the near future.

But if I did, this sweet bad boy would most definitely be on the menu!

I don't own a juicer (and quite frankly I don't see the point in wasting precious and nutritious fruit and veggie pulp) so I just blitzed everything up in my little blender with some water and it was good to go. Its both earthy and sweet and full of all those good things that will leave you feeling satisfied and refreshed, plus its a great way to boost your fruit and veg intake!


ABC(LG) Juice


Apple
Beetroot
Carrot
Lemon (the juice of)
Ginger (~2 cm chunk, peeled)


Roughly chop up everything and blend it all together with enough chilled water to make it smooth and enjoy!


Monday, 21 March 2016

Hot Cross Buns (v)


Easter is just around the corner and what better reason do you need to stuff your face with hot cross buns?

Delicious and warm from the oven, stuffed with spices and fruits and coated in a sticky glaze... ohhh yeahhh! 

But what about those of us who want to skimp on the eggs, milk and butter? Are we not worthy of these festive fancies? Must we be deprived of their toasty awesomeness?

They may take our lives, but they will never take our freedom!

Or something like that... 


I came across this recipe from veganlifemag.com for a vegan version of Hot Cross Buns and I am ever so glad I did. 

These buns are light and fluffy and choc full of those familiar flavours you know and love!  I mixed things up a little in terms of the glaze and cross mixture but stuck to the original bread recipe because why improve on perfection?

Best of all, they are also animal free!

Enjoy my vegan friends and keep an eye out for any rabbits who come creeping across your lawn... they are probably after your leftover buns!


Hot Cross Buns (Vegan!)


350g strong bread flour
1 ½ tsp ground mixed spice
1 ½ tsp ground cinnamon
1 sachet (2 tsp) easy–blend yeast
25g caster sugar
100g currants
50g mixed peel
75g vegan margarine, melted
175ml non-dairy milk, warmed, plus a little extra to glaze

 For the Crosses
 1/4 cup plain flour
1/3 cup water 

To Glaze
 Jam of your choice (I used my Nana's homemade fig jam but apricot works well too!) 


Mix the yeast and sugar together in a small bowl and then gradually add the warm soy/nut milk. Leave for approximately 5 minutes.

Sift the flour, mixed spice and cinnamon into a large bowl and make a well in the centre. Add the yeast mixture into the well and stir until combined. Then add the currants, mixed peel and margarine and mix together well until a dough forms.


Take the dough out onto a lightly floured surface and knead for approximately 10 minutes.
Place the dough back into the large bowl and cover with a tea towel or some cling film. Place this in a warm place for approximately 2 – 2½ hours or until the dough has doubled in size.


Take the dough back out of the bowl onto a lightly floured surface and knead again for approximately 5 minutes.


Split the dough into 12 equal pieces in the required shape, place onto a baking sheet and cover with a tea towel or cling film again. Put in a warm place for approximately 45 minutes to an hour.


To make the crosses, whisk together the flour and water until you have a smooth paste. Pour into a piping bag and pipe crosses on top of each bun 


Once the buns have risen, heat the oven to 180°C and lightly brush the surface of each bun with some extra soy/nut milk (try and go around the crosses so as not to smear them). Bake for 20 minutes.

Brush the buns with your jam while they are still warm and serve.


Thursday, 10 March 2016

Coconut, Lime and Pistachio Cheesecakes (v) (gf) (df)


Pistachios?  Love them!

Coconut? Can't get enough.

Lime?  Zest it to me baby! 

The combination of all three into a delicious, creamy cheesecake mixture that is both vegan and gluten/dairy free? 

SHUT UP AND TAKE MY MONEY!


I saw this recipe at Life of Goodness and thought it looked fantastic, but decided to make a couple of small adjustments when trying it for myself in the hopes of giving the pistachio flavour a bit of a boost. Not being an overly strong flavour it easily becomes lost when competing with powerhouses like coconut and lime, hence why I added a pistachio paste to the filling mixture. Even with the paste the pistachio flavour is only subtle, but I think it just gives it that little bit of somethin' somethin'. Plus you get to eat- I mean 'sample'- the pistachios as they are toasting which is never a bad thing!

I also wanted to try using vegan gelatine as a means of setting the cheesecake rather than relying on the solidifying of coconut oil or cacao butter which so many vegan cheesecake recipes do. I have to say I was quite impressed with how it worked and from taste and texture alone I don't think I would have been able to tell the difference between the gelatine and full fat version!

Oh, did I mention these are vegan, gluten free and dairy free? I did? Well I'm telling you again. Embrace it.


Coconut, Lime and Pistachio Cheesecakes


For the Base


1 cup dates
1/2 cup desicated coconut
1 cup raw mixed nuts
1 tbsp chia seeds
3 tbsp coconut oil 


For the Filling


85g raw pistachios
30ml coconut oil
1 tin coconut cream
1 sachet powdered vegan gelatine
2 cups raw cashews, soaked overnight
2 tsp vanilla extract
Juice and zest of 2 limes
1/4 cup maple syrup


For the base simply throw all of the ingredients into a food processor and blitz until well chopped and you're left with a sticky mix without any large chunks. Press into the base of a lined tart tin or several individual sized tins and refrigerate to firm up while you make the filling. 

For the filling, start by making your pistachio paste. Dry roast the pistachios in a low/med oven or in a frypan until toasted (but not burnt!) and set aside to cool. Blitz in a small food processor until well ground then slowly add in the oil and blitz until you have a paste. 

In a small saucepan add the coconut cream and gelatine powder and heat, stirring frequently, until it comes to the boil.  Remove from the heat and allow to cool slightly.

Place the paste, coconut milk mix and  and remaining filling ingredients into your food processor and blend until the mixture is totally smooth. Spoon over the top of the chilled bases and refrigerate until totally set. 

Top with extra lime zest, shredded coconut, pistachios and dried rose petals.  


Saturday, 27 February 2016

Potato and Rosemary Pizza (v, df)


I am a girl who loves herself some carbs, and this recipe has that need totally covered.

Pizza - Check.
Potatoes - Check.
Vegan friendly - Check. 

 No further explanation needed. Get some pizza in your lovely faces right now!


Potato and Rosemary Pizza


Ingredients


Pizza Base:

250 strong white flour
1/2 tbsp salt
1/2 tsp sugar
1 tsp instant yeast
1 tbsp olive oil
175ml warm water
     

Toppings:
 
1 large potato, thinly sliced
2 tbsp olive oil
1 large sprig rosemary

20g non-dairy cheese of your choice, sliced**

**If using a dairy cheese I would recommend a brie or other semi-soft cheese


Method

To make the pizza base start by mixing the dry ingredients in a bowl and making a well in the centre. Pour the olive oil into the well and mix with enough warm water that the mixture comes together to form a soft dough. 

Knead on a lightly floured surface for ~10 minutes until smooth and elastic then place in a lightly oiled bowl (this will help stop the dough sticking to the bowl as it expands), cover with clingwrap or a clean cloth and leave in a warm place for an hour or until doubled in size. 

Tip the risen dough onto a floured surface and knead again for a further 2-3 minutes. Roll out to fit a lightly greased pizza tray ready to receive the toppings.    

Heat a pan of water, tip in the potato slices and simmer for 5 minutes until just cooked through. Drain the potatoes and and add to a bowl with the olive oil and rosemary. Mix together well so that the potatoes are completely coated.
 
Scatter the cheese over the pizza base, then arrange the potato mixture on top. Season with salt and pepper, then bake for 20 minutes, until the pizza base is golden and the potatoes are starting to brown.
Cut into that gorgeous mo-fo and enjoy!


Saturday, 9 January 2016

Wild Rice Summer Pudding


When my sister and I were in Melbourne last year we went traipsing through St. Kilda in search of a cafe that I had stumbled across while looking up nearby vegan eateries the night before. We took several detours (damn you iPhone maps app! *shakes fist*), got whistled at by a passing rubbing truck driver and stared down by two West highland terriers as we passed a human hairdressers (and yes one of us did sing 'How Much is that Doggy in the Window') before eventually arriving at the most hippest of hipster cafes.

As we entered Monk Bodhi Dharma we passed by two employees(?) sitting on upturned crates out the front, one sporting a thick heads of dreadlocks tamed by a well-worn bandanna and another with a sharp pixie cut and solid nose ring. Maybe it was my imagination, but I could have sworn that as we stumbled past, sweaty faced (did I mention damn you iPhone maps?!) and starving, Dreadlocks looked us in the eye and gave a solitary nod of his head as if to say, "Yes you tourist yuppies, you have proved your worth by uncovering the hidden wonderland and may now enter and bask in her organic bounty".

Or, you know, something like that. Maybe he was just shooing a fly from his face. Who knows!

Upon entering all our sweating and swearing was vindicated. Numerous coffee grinders lined one wall, each with a different variety of bean displayed on the chalkboards above them. Industrial lighting hung low over the tables, topped of by exposed brick walls, concrete floors and a mish mash of tables and chairs. Instagram gold! Just look at the dirty bottle pretending to be a vase! Who does it think it is?!


After perusing a the menu I settled on their coconut and vanilla rice pudding with earl grey and spice macerated fruit, toasted almonds and coconut. It was beyond good. It was scrumdidlyumptious. It was also the perfect breakfast for a chilly morning, being warm and filling.

I'm not sure what sparked my memory, but for a few weeks now I have been fondly remembering this particular meal and craving a repeat. Obviously I'm not flying back across the country just for a bowl of rice pudding, wonderful though it may be, but I could whip up my own version at home. Maybe topped with some spicy poached pears... cinnamon quills... oh possibilities!

Unfortunately it is currently summer here. And has been for as long as I can remember. Seriously, I am struggling to remember the smell of rain or when we didn't have a day over 28 degrees! Not the type of weather once enjoys a steaming rice pudding in.

Since who knows when it will actually be cool enough for that, I thought why not be my adaptable self and create a summer rice pudding instead?

And thus this post comes full circle
(didn't think I would make it did you?)

I threw together this summer pudding using wild rice (I used tri-colour but I think any type would work?), Vitasoy coconut milk, fresh fruit and chopped nuts. Still quite filling but oh so much more refreshing!

I have become a little bit addicted to Vitasoy Coconut milk (not sponsored but if you're listening Vitasoy I'm open to selling out...). Its mostly just filtered water with a little coconut cream added but it tastes super coconut-y and I use it in the place of proper coconut milk the majority of the time to keep my fat intake down. Alternatively you could use a blend of half coconut milk with half water or even some non-dairy milk for a super creamy pudding.

To let the fresh fruit really shine and keep it summery the pudding itself isn't overly sweet, but you could always add some extra sweetener or even throw some chopped dates into the pot while the rice is cooking if that's more your style.             

If you have made it this far through my ramblings well done to you! Your reward? This rockin' rice recipe! Enjoy!


Wild Rice Summer Pudding


Serves ~4-5


1 1/2 cups wild rice
4 cups Vitasoy Coconut milk (or blend of half coconut milk/ half water or non-dairy milk)
2 tbsp maple syrup (or other sweetener), more or less to taste
1 vanilla pod, split
Pinch salt
1/2 tsp ground cardamom
1 1/2 tsp ground cinnamon


To Serve (take your pick or create your own combination!):

Fresh fruit (e.g. mango, banana,blueberries, strawberries, kiwi fruit,
Toasted almond meal
Toasted coconut flakes
Edible flowers
Roughly chopped nuts
Orange zest
Coconut yogurt 


Place all of the pudding ingredients into a medium saucepan and bring to the boil, making sure the stir frequently to stop rice sticking to the bottom.

Once it has come to the boil turn the heat to low and simmer, stirring frequently for ~15 to 20 minutes or until the rice is tender and most of the liquid has been absorbed. 

Remove from heat and allow the pudding to cool and then place in the refrigerator until chilled. At this point if too much of the liquid has been absorbed and the mixture has become clumpy stir through some extra coconut milk to loosen the pudding. 

Spoon into serving dishes and top with your choice of fresh fruits, nuts, berries or whatever your summer-loving heart desires!


Sunday, 3 January 2016

Tropical Chia Pudding with Mango Sorbet


Super easy and refreshing and perfect for breakfast, a snack any time of the day or even for a light dessert!

I topped mine with passionfruit pulp, coconut flakes and blueberries but you could use whatever you have on hand (some granola might be nice... just saying).


Tropical Chia Pudding with Mango Sorbet


For the Mango sorbet:
1 banana, thinly sliced and frozen

flesh of half a mango, frozen
1/4 cup coconut milk

For the Chia Pudding:
1/4 cup chia seeds
1/2 cup coconut milk
1 tbsp maple syrup (or other sweetener)

Optional Toppings:
passionfruit pulp/juice
coconut flakes
blueberries


To make the mango sorbet, simply blend the mango, banana and coconut milk in a food processor until smooth. Spoon into a container and place in the freezer to stop it melting.

For the chia pudding, mix all ingredients in a glass and refrigerate until the liquid has been totally absorbed (about 1 hour). 

Spoon the sorbet over the top of the chilled chia pudding and spoon/sprinkle over your desired toppings.  


Saturday, 12 December 2015

Raw Chocolate and Orange Jaffa Cheesecake


In this new age of Instagram obsession, #foodporn and an increasing fascination with healthy eating its hard to believe there are still people out there who haven't drooled over a picture of some sort of raw or vegan food, even if they didn't know it was raw/vegan/healthy. 

Yet there are still those who turn their noses up at the suggestion of a chia pudding or a raw vegan cheesecake ("Its not even a cheesecake if it doesn't have cheese in it!") - well to them I say sit your butts down and cram some of this Choc Orange Cheesecake in your facehole! See how pessimistic and gastronomically naive you are when your mind is being blown by the creamy textures and rich flavours of this mother chucker. 

Still complaining about the lack of 'real cheese' over there are you Gary? Didn't think so... (and if you are then there is no helping you and I pity you).

In all seriousness this cheesecake is the bee's knees. The cat's pyjamas. Some other nonsensical saying which translated to 'The Bomb!'. 

It's creamy, decadent, raw, vegan, gluten and dairy free and basically all the good things you want in a healthy dessert. Give it a go and show that poor, clueless Gary in your life what he's missing!   


Friday, 27 November 2015

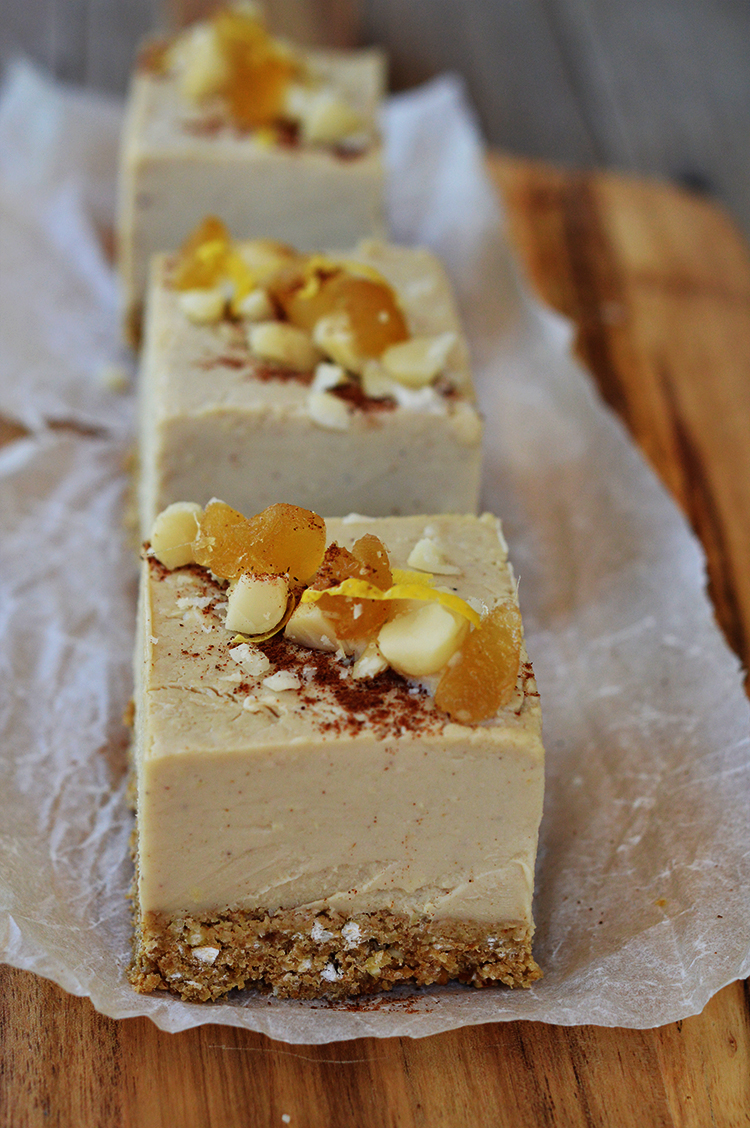
Lemon and Ginger Raw Cheesecake Slice


This cheesecake is a bit of an homage to my lovely mother (aka. 'Love Chunks', aka 'Mother Bean' etc.). Lemon and ginger are two of her favourite flavours and being the conniving little scamp that I am I decided to use this to my advantage in my life quest to 'hippify' her.

Throw a bunch of ginger and lemon into a sweet and creamy filling, spoon it onto a crispy but also chewy base (also dusted with ginger) and let the magic happen... mwahahaha how could she resist?!

I am actually also a huge fan of lemon and ginger, especially in the summer where the flavours and a bit lighter and more refreshing than something like chocolate. This slice is very rich given the high nut/fat content but it is also sweet, tart and refreshing - the perfect snack for a summer afternoon! 


Give it a go and let me know what you think!


Lemon and Ginger Cheesecake Slice


Makes between 12-16 serves


For the Base:

1 1/4 cup oats
1 cup desiccated coconut
1 cup pitted dates
1 tsp vanilla extract
2 tbsp maple syrup
2 tsp ground ginger
1/2 buckwheat grouts
1 tbsp coconut oil


For the Filling:

4 cups raw cashews, soaked overnight in water (don't discard the water!)
2 tsp vanilla extract
1/4 cup maple syrup
zest and juice of 1 lemon
2 cm piece of ginger, peeled and finely grated
1/2 tsp mixed spice (optional)


To make the base simply throw all the ingredients in a food processor and blend until becomes combined and dough-like. Press into the base of a square 20cm tin lined with non-stick paper and refrigerate while you make the filling.

For the filling, wipe out your food processor and blend all the filling ingredients. If you think the mixture is to thick add a some of the cashew soaking water (or normal water if you forgot to save it...) until you get the right consistency. It should be thick and stick to you spoon but also loose enough to be spreadable. 

Pour over the top of the chilled base, smooth the top and refrigerate until set. 

Eat as it is or decorate with lemon rind, glace ginger, raw nuts or whatever else tickles your fancy! 


Tuesday, 27 October 2015

Beet and Bean Burgers


I'm not really sure why, but lately I have been having pretty intense cravings for burgers. 

Now I'm not really the kind of person who gets many food cravings, though if I physically see and smell something delicious you'd better believe it is taking all of my willpower to not take down who ever is in possession of said delicious item and cram it into my face hole. But the feeling usually passes pretty quickly and I am free to continue on with life.

Not so lately. For whatever reason my mind has become clouded with dreams of chunky patties, crisp lettuce and creamy sauce. I have been dreaming of rolling on the floor making burger angels as I laugh like a demented person. Whenever I enter a restaurant I quickly flick to the burgers/sandwiches section and by god there had better be a veggie burger on there or a whole storm of negative yelp reviews are going to be raining on that poor, unsuspecting establishment. 

Whatever the cause (hakuna your tatas Mum! it is most definitely not one of THOSE sorts of cravings!), when I found my self thinking "Oh, that Krabby Pattie looks pretty good..." I knew something had to be done.

Enter the Beet and Bean Burger.

If you look up vegan burger recipes you will find that many of these feature beetroots and some variety of beans and for good reason. Beans provide the perfect burger base, giving body and protein to the pattie which would usually be played by the role of Mr. meat. As well as giving it a kick-ass colour, beetroots provide a huge amount of moisture to keep that pattie succulent even while the outside is being crisped and just seems to add an earthiness and enhance all the other flavours you are adding in. 

I happened to stumble across this recipe from The Minimalist Baker  which sounded (and looked) ammmmazing so I decided to create my own version, changing up the flavours and adding a few extra bits and pieces. 

Let me tell you: my burger cravings = 100% satisfied!

So tasty and full of veggies, I served my pattie with the usual burger accompaniments - think wholegrain bun, fresh salad, creamy avocado and crispy potato chips! 

I would 100% recommend you give it a go and let me know what you think and if you have ever considered turning tricks to Mr. Krabs for a burger bite. 


Beet and Bean Burgers


(Makes about 6 patties)


1/2 zucchini, grated
1/2 raw beetroot, grated
1/4 cup corn
1 cup cooked quinoa
425g black beans, crushed with a masher or fork
1/2 brown onion, very finely chopped
1/2 cup kale, finely chopped
 1/4 cup almond meal (may need more or less depending on moisture)
 1 tsp ground cumin
Salt and pepper to taste


Thrown everything into a large mixing bowl and use your hands to mix and bring together until well combined. 

If you feel the mix is to wet to hold together add a little extra almond meal to soak up some of that excess liquid. 

Take large handfuls of the mixture and form into patties. Spread them over baking trays lined with non-stick paper and bake at 180 degrees Celsius for about 30 minutes or until crispy on the outside, very gently flipping at about the halfway mark (they are fragile and will break if you try an aggressive, pancake style flip so COOL YOUR JETS and be gentle!). 

Eat are they are, served with a salad or sitting atop a burger buns crammed with salad and topped with some creamy mashed avocado (plus crispy baked potato chips/fries because CARBS).


Thursday, 22 October 2015

The Big JO! (a.k.a Jaime Oliver's Moorish Crunch Salad)


I had several great loves growing up...

Leonardo DiCaprio circa Romeo and Juliet  and Titanic was a big one! With that floppy 90's hair and looking down the camera like you just kicked his favourite puppy... swoon! 


As I got a little older we drifted apart (*I'm sorry Leo my love, can we still be friends?*) , my tender heart was eventually claimed by another. Like so many other girls (and lets be real, grown married women too!) at the time, I was seduced by the blue eyes, gelled hair and fennel fondling hands on Mr. Jamie Oliver.

Teen crushing aside, the man formerly know as the Naked Chef is still one of my favourite tv personalities to this day (and as someone who swings between total fangirling obsession to an audible snort of the nose and maybe a lazy 'meh...' in the space of a few months, this is kind of a big deal!).

And guess what all you fellow veggie loving, non-meat eaters?! He has a ton of vegetarian and vegan recipes on his website and posts a new one every week for Meat-Free Monday. #Legend. 

To be honest, I'm not really one for following recipes others have written. I will for sure take bits and pieces and inspiration, but it usually ends up being some Frankenstein of its original self as I stamp my own personal flavour on it. And by that I don't mean I go flicking drops of my sweat and tears into thing.

Don't be gross guys. I know your brand. 

Swiftly jumping back upon my train of thought, one sunny afternoon I decided to break my usual trend and actual follow one of the recipes I had found on jamieoliver.com - spoon for spoon, raisin for raisin! It was one of those rare, wonderful decisions I make from time to time.

This Moorish Crunch Salad delivers what it promises. Its crunchy, its moorish. Its what you would generally call a salad.

It even converted a recipe-phobe like me. Sometimes colouring within the lines and actually following a recipe can be a good thing, who would have though?! Give this one a go and let me know if you loved it as much as I did (or if the temptation grew to much and you threw half a pineapple and a handful of mustard seeds in there just because...).   


Recipe from jamieoliver.com


300 g carrots, peeled
150 g radishes 
2 crunchy eating apples
1 small handful raisins or sultanas
1 handful fresh parsley, roughly chopped
1 handful fresh mint, roughly chopped
4 tablespoons sherry or red wine vinegar
8 tablespoons olive oil
1 tablespoon tahini
sea salt
freshly ground black pepper
2 tablespoons sesame seeds, toasted in the oven


Finely slice your carrots into matchstick-sized batons. 

Finely slice your radishes – you can leave a little of the tops on if you like. 
 
Quarter your apples, remove the cores and finely slice. 

Add all these to a bowl with the rest of the ingredients, apart from the sesame seeds. Toss together, carefully checking the seasoning, and serve with the sesame seeds sprinkled over the top. Eat straight away.