Showing posts with label raw. Show all posts

Saturday, 12 December 2015

Raw Chocolate and Orange Jaffa Cheesecake


In this new age of Instagram obsession, #foodporn and an increasing fascination with healthy eating its hard to believe there are still people out there who haven't drooled over a picture of some sort of raw or vegan food, even if they didn't know it was raw/vegan/healthy. 

Yet there are still those who turn their noses up at the suggestion of a chia pudding or a raw vegan cheesecake ("Its not even a cheesecake if it doesn't have cheese in it!") - well to them I say sit your butts down and cram some of this Choc Orange Cheesecake in your facehole! See how pessimistic and gastronomically naive you are when your mind is being blown by the creamy textures and rich flavours of this mother chucker. 

Still complaining about the lack of 'real cheese' over there are you Gary? Didn't think so... (and if you are then there is no helping you and I pity you).

In all seriousness this cheesecake is the bee's knees. The cat's pyjamas. Some other nonsensical saying which translated to 'The Bomb!'

It's creamy, decadent, raw, vegan, gluten and dairy free and basically all the good things you want in a healthy dessert. Give it a go and show that poor, clueless Gary in your life what he's missing!   


Friday, 27 November 2015

Lemon and Ginger Raw Cheesecake Slice


This cheesecake is a bit of an homage to my lovely mother (aka. 'Love Chunks', aka 'Mother Bean' etc.). Lemon and ginger are two of her favourite flavours and being the conniving little scamp that I am I decided to use this to my advantage in my life quest to 'hippify' her.

Throw a bunch of ginger and lemon into a sweet and creamy filling, spoon it onto a crispy but also chewy base (also dusted with ginger) and let the magic happen... mwahahaha how could she resist?!

I am actually also a huge fan of lemon and ginger, especially in the summer where the flavours and a bit lighter and more refreshing than something like chocolate. This slice is very rich given the high nut/fat content but it is also sweet, tart and refreshing - the perfect snack for a summer afternoon! 


Give it a go and let me know what you think!


Lemon and Ginger Cheesecake Slice


Makes between 12-16 serves


For the Base:

1 1/4 cup oats
1 cup desiccated coconut
1 cup pitted dates
1 tsp vanilla extract
2 tbsp maple syrup
2 tsp ground ginger
1/2 buckwheat grouts
1 tbsp coconut oil


For the Filling:

4 cups raw cashews, soaked overnight in water (don't discard the water!)
2 tsp vanilla extract
1/4 cup maple syrup
zest and juice of 1 lemon
2 cm piece of ginger, peeled and finely grated
1/2 tsp mixed spice (optional)


To make the base simply throw all the ingredients in a food processor and blend until becomes combined and dough-like. Press into the base of a square 20cm tin lined with non-stick paper and refrigerate while you make the filling.

For the filling, wipe out your food processor and blend all the filling ingredients. If you think the mixture is to thick add a some of the cashew soaking water (or normal water if you forgot to save it...) until you get the right consistency. It should be thick and stick to you spoon but also loose enough to be spreadable. 

Pour over the top of the chilled base, smooth the top and refrigerate until set. 

Eat as it is or decorate with lemon rind, glace ginger, raw nuts or whatever else tickles your fancy! 


Sunday, 19 July 2015

The Raw Kitchen Kale Chips


For those of you from Western Australia, you will understand me when I say I am "more of a Freo person". 


Though I cannot stand their football team (EAAAAGGGLLLEESSS!), everything else about the port town I love! Casual and relaxed, largely aged and rundown yet sprinkled with modern and super-urban eateries and tiny gourmet food stores. Plus its cafes generally have a variety of vegan options available so thumbs up for that!

My sister and I have a weekend tradition where we head on in to Kakula Sisters and stock up with bags full of nuts (cinnamon almonds, you complete me!), dried fruit, various flours, spices and whatever else we can carry to the front till (check out the store's website here  - seriously, if they say Disneyland is the happiest place on earth this shop is like Mickey Mouse on crack, riding a unicorn and farting rainbows! FYI I need a painting of this scene in my life...).

However, before we make that delightful visit, we always make stop for lunch and order far to much of everything at The Raw Kitchen. I could go on and on for hours about the incredible (largely raw) vegan menu, the charmingly urban design, the fantastic attached shop stocking a range of eco-friendly ceramics, lotions and candles, the visible focus on sustainability and even the yoga studio where they hold regular classes! *Sigh*... Hippie heaven!

Bearing all this in mind, imagine my delight when I came across this post by Urban Walkabout where they purported to have uncovered The Raw Kitchen's recipe for their famous kale chips! *INSERT SCREAMING FACE EMOJI!*


Better than Christmas. 
Better than a room full of husky puppies smelling like bubblegum. 

Possibly better than a mother's love...


As part of our sisterly tradition, a lunch at The Raw Kitchen is simply not complete without a side dish of these crunch kale chips are, sceptical as I was, this recipe is indeed just like those served up in the restaurant! Rich, nutty and crunchy, if you can stop at just a handful of these bad boys you're a better person than me... or at least a less kale-stuffed one.


NOTE: The thickness of the coconut cream batter means that they will take longer to cook, though if you don't have a dehydrator or the patience you can cook them in an oven set to low.


The Raw Kitchen's Coconut Cream Kale Chips 

Courtesy of Urban Walkabout


INGREDIENTS:


1kg kale
1 young coconut (makes roughly 500ml coconut cream)
2 clove fresh garlic
30ml olive oil
75g nutritional yeast
1 lemon, zest & juice
60g sesame seeds
1 tsp salt
Pinch smoked paprika


METHOD:


Strip the kale off of the stalk and submerge in water for several minutes and transfer kale into colander or lettuce spinner to drain.

Tear the leaves into smaller pieces (remember, will shrink significantly) and transfer to a mixing bowl.

Remove the tops of the coconuts and transfer the coconut water into a jug / glass

Spoon out the coconut meat and transfer to a bowl. Ensure clean and free of any husk

Blend the coconut meat and water in a high speed blender, adding a little water at a time until desired consistency has been reached. We prefer a thicker cream for this recipe

Add & blend garlic, olive oil, yeast, salt, lemon and juice

Pour the mix over the bowl of kale and massage together until well coated

Stir the sesame seeds through

Spread the coated kale leaves evenly over a Teflex-lined dehydrator tray

Sprinkle generously with smoked paprika

Dehydrate overnight for roughly 8-10 hours

Remove when crisp (almost wafer-like) and store in an air tight container for up to 2 months


Sunday, 7 June 2015

Vegan Cappucino Cheesecakes


Believe it or not the idea for this dessert came from wanting to try and create a vegan sponge cake to use as a patterned joconde imprime (fancy french talk for sponge with a patten in it used to wrap a cake in. See here). One look at this recipe and you can probably guess things did not go as originally planned... but let's not dwell on that! 

I love coffee. I love vanilla. I love chocolate. 

Combine the three into a multi-layered, vegan, gluten and dairy free, nature packed chilled dessert and you kind of know its going to be some sort of amazing. Vegan sponge be damned! (for now...muh ha ha!)


Now I decided to be a sadist and make individual-sized cakes but you could easily just use a small baking tin to make one large cake and slice it as needed. Also, I used instant coffee in the base and middle layer but if you wanted to make this dessert totally raw you could swap these for the cold-dripped variety, though the flavour may not be as strong. Do what you wish free-will lovers! 


Vegan Cappuccino Cheesecakes


For the Base 


1 cup of dates, pitted
1 tsp dried instant coffee
1 cup of raw nuts (hazelnuts, almonds, cashews etc.)
2 tbsp organic cacao powder
1 tbsp pure maple or agave syrup


For the Cheesecake Filling 


2 cups raw cashews, soaked until softened
2 cups raw macadamias, soaked until softened
1 tbsp vanilla bean paste
1/2 cup maple syrup
1/4 cup coconut oil, melted
1/2 cup water (add a little at a time as needed)

2 heaped tbsp raw cacao
2 tbsp super strong black coffee, cooled
(coffee amount will depend on your tastes!)


To make the base simply blend the dates, nuts, cacao and sweetener in a food processor until totally chopped and it comes together to form a dough consistency (if its still to dry add a teaspoon of water at a time and blend until it all comes together. 

Press the mixture into the base of non-stick baking tin or the individual non-stick muffin tray holes. Freeze while you make the filling. 

To make the filling blend everything except the cacao and coffee in the food processor until totally smooth and 'creamy' (mine took about 6 minutes).

Divide the mixture into three bowls. Into one add the raw cacao and mix until totally combined. Spoon the chocolate cheesecake mixture on top of the chilled base(s) and smooth flat. Chill in the freezer for 10 minutes to allow it to firm up.

In the second bowls of filling stir through the coffee and spoon or pipe it on top of the firmed chocolate layer.  Chill again for the coffee layer the firm. 

Spoon or pipe the remaining plain filling mixture atop the coffee layer and carefully smooth the top. 

Chill the entire cake for about an hour to allow it to totally set.     

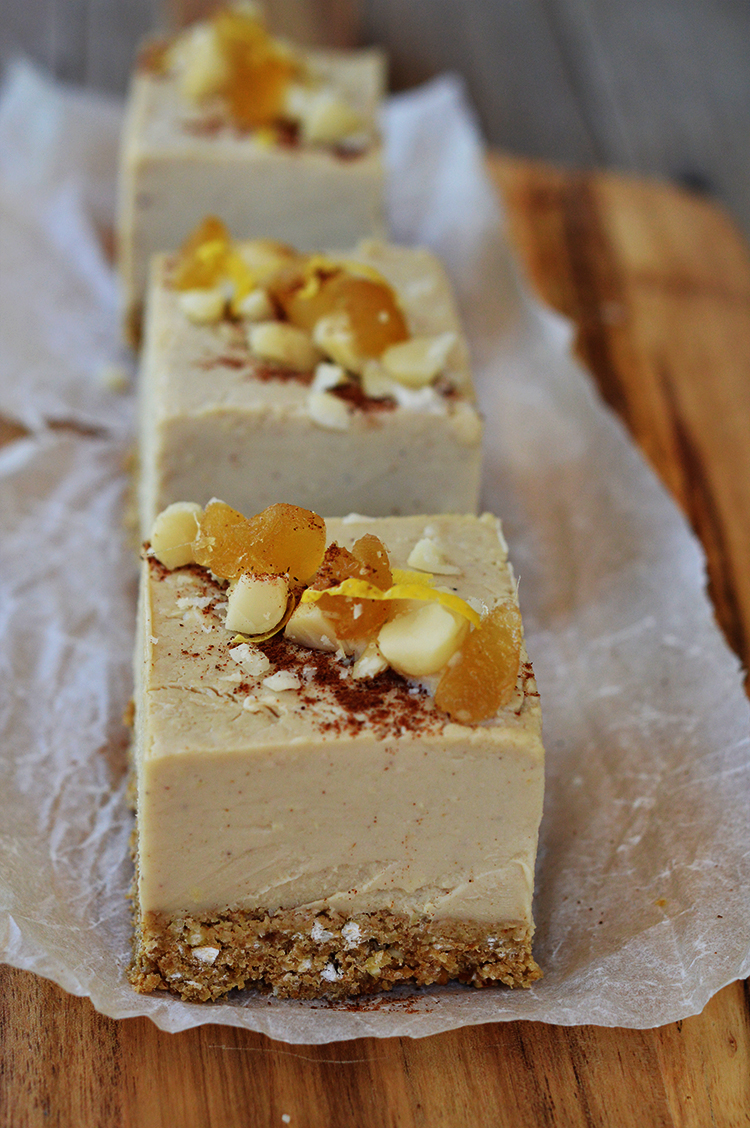
Remove from the freezer and dust with some extra cacao, top with some raw nuts or just eat as is.

Enjoy! xo


Wednesday, 29 April 2015

Raw Vegetable Pasta with Salsa Verde


Autumn has well and truly set in her in Western Australia; the days are shorter, rain is finally starting to fall and by the time I get home from work and the gym there is very little daylight in which to snap a quality photo and do a delicious meal justice!

Nevertheless, I managed to get a quick snap of this tasty little baby before wolfing it down (I had just finished a long cardio session and I was huuuuuuungry). I had been dreaming and scheming of it all day at work so when it finally came time to tuck in it was go time!

Basically just a good old veggie fest packed with tons of flavour and fresh herbs, what could be better? A base of beetroot and zucchini noodles, tossed through a fresh and powerful salsa verde and a variety of chopped raw vegetables. Top that off with some toasted pine nuts and walnut parmesan (check out Emily's recipe at This Rawsome Vegan Life) if you please and your walking on sunshine.


Raw Vegetable Pasta with Salsa Verde

Serves 2 or 3 


1 Zucchini
1 Beetroot, raw and unpeeled  

1 cup of packed green herbs (I used a mix of parsley, basil and dill), roughly chopped
1 clove of garlic, crushed
1 heaped tsp Capers
1 tbsp Apple Cider Vinegar 
3 Tbsp Olive Oil (I used an organic cold-pressed one but you can use whichever type you prefer)
Juice of half a Lemon
Salt and Pepper to taste

Large handful of cherry tomatoes, halved
1/2 cup corn 
1/2 yellow capsicum, diced 
1/4 red onion, diced
Large handful of baby rocket
1/2 Avocado, flesh diced

Optional: Toasted pine nuts and walnut parmesan to serve  


Use a spiralizer to make thin noodles from the zucchini and beetroot and add them to a large mixing bowl. If you don't have a spiralized (lets be honest, they are insanely overpriced!) just use a knife to slice them super thin and noodle-like.

Using a mortar and pestle or a blender, blend the herbs, garlic, capers, vinegar, oil, lemon juice and seasoning into a dressing and pour over the top of your noodles.

Add the remaining vegetables to the mixture and toss to thoroughly mix and ensure everything is covered in the dressing.

Serve as is or top with some toasted pine nuts and walnut parmesan.

Enjoy!


Wednesday, 4 March 2015

Raw Vegan Cherry Ripe Tarts


I have to say this recipe has my Grandad written all over it!

For as long as I can remember he has been a cherry ripe fiend. It's almost a guarantee that you will find one slipped into every birthday, Christmas and fathers day present! Yet, somehow, we all still think we are being original sentimental...

This choc-coconut lust has been tempered in the last few years however with his development of type-2 diabetes, though god knows these fatty sugar bars probably won't be providing a whole heap of nutritional value to even the healthiest of individuals! A single 52g bar will give you almost 20% of your recommended daily fat intake and 30% of your recommended sugar intake! Not really surprising when their first ingredient listed is sugar (but clearly this doesn't make them sweet enough as it is soon followed by sweetened condensed milk and wheat glucose syrup... you get the picture).

Now don't get me wrong. I'm not on some fat-shaming, self-righteous mission to denounce those who indulge in such snacks. I'm more of a "you can eat whatever the hell you want with no judgement, just don't expect me to want to eat it too!" kind of person. I think if people are educated about what they are eating who am I to tell them what they can and cannot put in their bodies?!


Now in terms of what goes into MY body, well then I'm a little more pedantic. I don't enjoy most traditional 'treats'. Just going to put it out there. I hate the gross sugary feeling they leave in my mouth. I hate the sickly feeling they give my stomach. I just plain don't enjoy them. Give me a crunchy kale chip seasoned with fresh spices or a filling, protein packed raw bliss ball over a mars bar any day! God, I really am one of 'those' people aren't I?...

But if you have read my earlier posts (and I know you have HAVEN'T YOU?!) you will know that I enjoy taking inspiration from the folks at Cadbury and Mars and creating desserts which won't leave me rolling on the floor in a sugar coma. I've made individual raw 'Bounty Bar' bites and recently I remade my raw Snickers Slice for my coworkers who are notorious chocolate addicts but raved about my healthier interpretation. So, coming full circle, this time I decided to try my hand at Granddad's favourite Cherry Ripe, the result being individual tarts which are crammed with chocolaty, coconutty, cherry...y(?) deliciousness!

Oh, did I mention they are raw, vegan, gluten and dairy free? They are. You're welcome. 


Raw Vegan Cherry Ripe Tarts


For the Crust:

 4 Tbsp Coconut Butter
1/3 cup Cacao
1/2 cup Coconut Flour
20 Pitted Dates
1 cup Walnuts 
3 tbsp Coconut Oil

 For the Cherry Filling:

 1 cup Cashews, soaked overnight
1/2 cup Coconut Butter
1/2 cup Maple Syrup
1 tsp Vanilla
2 cups pitted Cherries
1/4 cup shredded Coconut (optional)
Extra water or non-dairy milk (optional)

  For the Chocolate Ganache:

3/4 cup Cashews, soaked overnight
1/3 cup Cacao
1/3 cup Maple Syrup
1 tsp Vanilla
1/3 cup Coconut Oil, melted  


To make the base simply throw everything in a food processor and blitz until you have a fine, wet crumb mixture. Press into the base of about 12 individual non-stick tart tins  (or you could make one large tart or slice) and freeze while you make the filling. 

For the cherry coconut filling, again, just stick everything in your food processor and blitz until the mixture is smooth and creamy. If you feel the mix is to thick and dry try adding some extra water or milk of your choice a little at a time until you have to consistency you want. If you want a more 'coconutty' taste you can add a little shredded coconut and stir it through the smooth mixture (this will also add a little extra texture if your that way inclined!).

Spoon the filling into your chilled tart bases, leaving a little room at the top for when you add your ganache, and stick back into the freezer for about 1/2 an hour or well chilled.

To make the ganache blitz the cashews in your food processor until fully chopped and fairly smooth. Add the remaining ingredients and process until the whole mix is totally smooth. 

Spoon the ganache onto the tarts and refrigerate until chilled and fully set.

Top with some extra chopped cherries, coconut or whatever else you want and enjoy! 


Friday, 2 January 2015

Green Smoothie #2015


Happy New Year!


I realise its been a while since my last post, but with Christmas, New Years, work etc I just haven't had the time!

Previously where I have uploaded anything to this blog it has been the result of many hours of cooking, setting up camera angles, trying to style the food as best as my limited abilities will allow etc etc... Not a quick process!

Thanks to the magic of technology and apps like the ever-fabulous Instagram (check out my account here!) I still snap and upload pictures of what I'm cooking up on a day to day basis with just the click of a button. So, in the interests of keeping this blog chugging along, I have decided that where I simply don't have the time to to create highly detailed, multiple angle, step-by-step style posts; I will simplify the posts so that you still have the recipe and whatever quirky observations I feel like throwing in, just with less focus on having multiple pictures. Though some may see this as me compromising on the blog's aesthetic quality, I feel like this is a worthwhile trade off if it means I am able to post more often and get more recipes out into the world for you to enjoy!

So what better time to start this little shindig than right now?!

See below for said shindiggery.


Refreshing Green Smoothie


Start your 2015 on the right foot with this super refreshing drink! If you're already on board the green smoothie train: I like you, lets be friends. If you haven't tried them yet: It's not to late! The train to deliciousness is still boarding!


Ingredients:


1/2 large banana
1/2 cup frozen mango
1 tsp chia seeds
1 cup almond milk (or other non-dairy milk or water)
1 packed cup of spinach leaves
Few ice cubes

Simply blend everything except the fruit until well processed and then add in the fruit and continue blending until totally smooth. Super easy!

(Side note: I rimmed my glass with some honey and dessicated coconut, optional but yummy!)

Sunday, 12 October 2014

Choc-Mint Nice Cream!


 Well hi there! I hope your having as good a weekend as I am! Oh wait, your can't possibly be because unlike myself you haven't been enjoying this summery delight!

It's Choc-Mint Nice Cream y'all!

Now I have posted about banana ice cream (a.k.a 'nice cream') before (check it out!) but this time I decided to mix it up a bit and add one of my sister's all time flavour combos to the equation. The result, the perfect treat to munch through on this glorious spring day.


 FYI I decided to top mine with a drizzle of raw chocolate sauce (simple mix of cacao, melted coconut oil and maple syrup) and some crumbed chocolate 'biscuits' (process some walnuts, dates, oats, cacao and maple syrup then shape into flat disks and bake or dehydrate until just crisp on the outside).

But now, on to the star of the show....


Choc Mint Nice Cream


4 small bananas 
Dash of milk (almond, dairy, soy, whatever!)
3 tsp Stevia (or your preferred sweetener)
2 tsp vanilla
Small bunch of mint, roughly torn up
3 tbsp cacao 


Start by slicing your bananas and placing them in a single layer in a zip lock bag. Freeze overnight or at least until fully frozen. 

Pop your frozen banana slices into a food processor with a small splash of your chosen milk and blend until it looks like soft serve. add the sweetener and vanilla and process again to combine. 


Split your banana mix in half and stick one half back into the food processor with the mint. Process the other half of the blended banana with the cacao until totally combined. 

Voila! If necessary you can stick your two mixes into plastic containers and freeze until they firm up to your liking or just alternate dollops of your nice cream into a hip-tastic mason jar and enjoy on the spot!   


Monday, 29 September 2014


What the?! Two posts in two days! Craaaaazzzyyyy!

Shock and awe aside, today I decided to share with you two recipes for my current favourite breakfast option: Overnight Oats. 

Not only are these oats packed with fibre, protein and just plain delicious, but they are also so easy and convenient! I usually throw them together in a screw top jar before I go to bed and take them to work with me in the morning. No fuss or messing around when your trying to get out the door!

Now because variety is supposedly the spice of life, I have two different variations of these oats and I want you guys to let me know which you prefer!


PB + Heeyyyyy!


The first flavour is a little number I call PB + Heeyyyy! 
This is my usual go to simply because its super quick and easy. As you will see in the recipe below I like to use PB2 rather than normal peanut butter purely for the sake of calorie cutting but you can use the traditional version if you prefer (PB2 is essentially peanuts which have been roasted and had a lot of the oils removed so you have all the flavour but less of the fat ). Also, in the recipe I used almond milk but you could use coconut, soy, dairy, whatever you choose.


Carrot Cake-Walk

The second flavour is a little number I made up yesterday called Carrot Cake-Walk.
Basically I had seen versions of raw carrot cakes around the Internet and thought, why should your oats be missing all that carrot loving? Well no longer! Time for that great carrot cake sweetness to make the move to breakfast. 


Both sound pretty good right? So here is what you'll need:


Ingredients:


PB + Heeeyyy

1/3 cup Rolled Oats (or instant)
2 tbsp Chia Seeds
1 tbsp PB2 powder (or normal peanut butter)
2 tsp Sweetener (you can use stevia, natvia or even equal if you choose)
5 or so Pitted Dates, roughly chopped 
1 cup Almond Milk (or coconut, soy, dairy, whatever you like)
 

Carrot Cake-Walk

1/3 cup Rolled Oats (or instant)
2 tbsp Chia Seeds
1 small Carrot (shredded or blended in a food processor)
1/4 tsp Cinnamon
1/2 tsp Mixed Spice
1 heaped tbsp Shredded Coconut
2 tsp Sweetener (you can use stevia, natvia or even equal if you choose)
5 or so Pitted Dates, roughly chopped 
1 cup Almond Milk (or coconut, soy, dairy, whatever you like)


The process is exactly the same for both, simply stick everything into a jar, stir or shake to make sure it is all well combined and stick in the refrigerator overnight. Voila! 


So now you all know how simple it is go and test out these wonder jars of oaty-goodness and let me know which flavour you think comes out on top. Though lets face it, when your eating these babies, everyones a winner!


Friday, 15 August 2014

Raw Snickers Slice *Updated*


*Update: I have made a couple of adjustments to this recipe and added some new (somewhat more asthetically pleasing) photos!*


First of all, sorry about the terrible photos! It was about 7pm when I took them and I suffer from a serious lack of good lighting in my house! That and I was running out the door to share these babies with my work friends...

However, one mouthful of this delicious, nutty slice and I'm sure all poor image quality will be forgiven...Its a freaking Snickers Slice which is actually good for you for Pete sake!


I actually came across this recipe from LiveLoveEatRaw on Instagram and knew there was no way I could resist trying it. I dare you to try! On second thought, no I don't. You really should try it. Right now.


I did make a couple of changes to the original recipe but you can follow whichever suits the ingredients you have on hand. Winner winner chicken dinner! 

**Just note, technically maple syrup isn't raw so if you are following a strict raw diet I would use rice malt syrup as a substitute as in the original recipe**


Raw Snickers Slice

You Will Need


For the Base:

1 cup almond meal
1 cup coconut flour
3 tbsp maple syrup
1/4 cup melted coconut oil
3 tbsp 100% natural peanut butter
1 tsp vanilla bean or extract
Pinch of salt 

For the Peanut Caramel Filling

3 cups pitted dates
1/3 cup coconut oil, melted
4 tbsp 100% natural peanut butter
1 tsp salt

Chocolate Topping

1/4 cup cacao powder
1/4 cup maple syrup
1/3 cup coconut oil
1.2 tsp vanilla extract
1/3 cup crushed peanuts 


Start by chucking all of the base ingredients into a food processor and blending until totally combined then spoon into a 20cm square baking tin lined with non-stick paper and press firmly so it is totally flat. Pop the tin in the freezer.

To make the caramel filling roughly chop the dates and then place in your food processor with the remaining filling ingredients and process until combined. At first it will look like it's not coming together but just be patient and keep on blitzing! When it's ready spoon over top of the chilled base and flatten down. Stick it back in the freezer while you make the topping.

In a mixing bowl whisk all of the topping ingredients except for the crushed nuts until they come together to form a delicious chocolate ganache. Pour over top of the chilled filling and gently shake the tin to make sure it is fully spread out and smooth. Sprinkle with the chopped nuts and stick back in the freezer or the fridge until set and firm.


 VOILA! Enjoy each mouth full of salty, sweet goodness! xo


Monday, 7 July 2014


Be it brought on by 'that time of the month', a bad breakup or a good old sweet tooth; sometimes you crave the sweet things in life. Often times this involves ice cream. 

But should we let these cravings ruin all our hard work in the gym for a few minutes of sugar-induced satisfaction?! Will you be regretting every mouthful as soon as you down the spoon?!

There is only one thing we say to gym-defying deserts: Not Today! 

What up Game of Thrones reference!


What you should have instead is a serving of 'Nice Cream', a healthy ice cream alternative sweeping rawists, vegans and the hippy instagram community. 


As the name suggests, this 'desert' is both delicious and nutritious! 

The ice cream is simply frozen banana blitzed in a food processor and layered with whatever fruits, nuts and flavours your sensible-yet-hungry heart desires.


Banana, Date and Coconut 'Nice Cream' 


You Will Need: 

3 Bananas
Handful of pitted dates
Large handful of dried, flaked coconut
Large handful of raspberries (or blueberries, chopped strawberries etc.)
Handful of pecans (or another type of nut)


Peel and slice the bananas into bite sized pieces and place on a tray lined with baking paper. Stick in the freezer for an hour or so until the banana slices are well frozen. 

Blitz the frozen banana in your food processor for about 10 minutes or until it becomes smooth and creamy (don't worry if it just looks chunky at first, just keep blending!). If the banana is too soft stick it in the freezer for 10 min or so until it firms up a little.
Grab your most hipster-ish mason jar and spoon a little nice cream into the bottom. Add a layer of berries, nuts, dates and coconut and continue filling your jar, alternating between banana and the flavourings. 

Voila! 

Enjoy your sweet fix guilt free!


Thursday, 5 June 2014


Feeling a little sluggish?

Having sweet cravings but don't want to blow those crunches, lunges, squats and (God help you!) burpees?

Never fear! I bring to you yet another raw slice recipe which is all natural, vegan, dairy and gluten free, full of protein and iron and its just all round drool-worthy.


I have previously posted a recipe for a Raw Choc Mint Slice (here) and, though it too is delicious and nutritious, I wanted to have a go at tweaking the recipe to include fresh mint and greens. Let me tell you, this was a wise decision!


Though both slices taste quite similar, I found that adding fresh mint and spinach gave the filling an amazing green colouring and the taste of the real mint gives it a really fresh and natural... almost earthy taste. Maybe 'earthy' isn't the right word... just trust me on this one!


Also, a side hobby of mine is video editing and I thought what better way to combine my interests than to create a recipe video tutorial for you lovely people! So enjoy and let me know what you think!


RAW CHOC MINT SLICE 2.0


For the Base:


4 Tbsp Coconut Butter
1/3 cup Cacao
1/2 cup Coconut Flour
20 Pitted Dates
1 cup Walnuts


For the Filling:

One Bunch of Mint
Large handful of Baby Spinach
1 cup Cashews, soaked overnight
1/2 cup Coconut Butter
1/2 cup Maple Syrup
1 tsp Vanilla 
1/2 tsp Peppermint Extract 


For the Topping:

3/4 cup Cashews, soaked overnight
1/3 cup Cacao
1/3 cup Maple Syrup
1 tsp Vanilla
1/3 cup Coconut Oil, melted


To make the base, blend all ingredients in a processor and press into the base of a 20cm square tin lined with baking paper. Stick in the freezer until firm and set.


To make the filling, again blend all ingredients in a processor until the mixture is almost smooth (the greens should be all chopped) and pour over the top of the frozen base. Smooth with a spatula or palette knife and put back in the freezer for at least an hour to set.


To make the topping, process all ingredients until smooth and pour over the top of the bottom two layers, smooth and then freeze until the entire slice is set and firm.


Slice up and enjoy!