Showing posts with label dates. Show all posts

Sunday, 7 June 2015

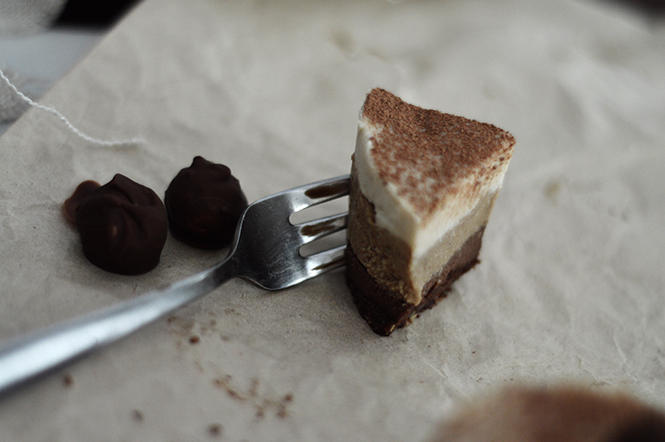
Vegan Cappucino Cheesecakes


Believe it or not the idea for this dessert came from wanting to try and create a vegan sponge cake to use as a patterned joconde imprime (fancy french talk for sponge with a patten in it used to wrap a cake in. See here). One look at this recipe and you can probably guess things did not go as originally planned... but let's not dwell on that! 

I love coffee. I love vanilla. I love chocolate. 

Combine the three into a multi-layered, vegan, gluten and dairy free, nature packed chilled dessert and you kind of know its going to be some sort of amazing. Vegan sponge be damned! (for now...muh ha ha!)


Now I decided to be a sadist and make individual-sized cakes but you could easily just use a small baking tin to make one large cake and slice it as needed. Also, I used instant coffee in the base and middle layer but if you wanted to make this dessert totally raw you could swap these for the cold-dripped variety, though the flavour may not be as strong. Do what you wish free-will lovers! 


Vegan Cappuccino Cheesecakes


For the Base 


1 cup of dates, pitted
1 tsp dried instant coffee
1 cup of raw nuts (hazelnuts, almonds, cashews etc.)
2 tbsp organic cacao powder
1 tbsp pure maple or agave syrup


For the Cheesecake Filling 


2 cups raw cashews, soaked until softened
2 cups raw macadamias, soaked until softened
1 tbsp vanilla bean paste
1/2 cup maple syrup
1/4 cup coconut oil, melted
1/2 cup water (add a little at a time as needed)

2 heaped tbsp raw cacao
2 tbsp super strong black coffee, cooled
(coffee amount will depend on your tastes!)


To make the base simply blend the dates, nuts, cacao and sweetener in a food processor until totally chopped and it comes together to form a dough consistency (if its still to dry add a teaspoon of water at a time and blend until it all comes together. 

Press the mixture into the base of non-stick baking tin or the individual non-stick muffin tray holes. Freeze while you make the filling. 

To make the filling blend everything except the cacao and coffee in the food processor until totally smooth and 'creamy' (mine took about 6 minutes).

Divide the mixture into three bowls. Into one add the raw cacao and mix until totally combined. Spoon the chocolate cheesecake mixture on top of the chilled base(s) and smooth flat. Chill in the freezer for 10 minutes to allow it to firm up.

In the second bowls of filling stir through the coffee and spoon or pipe it on top of the firmed chocolate layer.  Chill again for the coffee layer the firm. 

Spoon or pipe the remaining plain filling mixture atop the coffee layer and carefully smooth the top. 

Chill the entire cake for about an hour to allow it to totally set.     

Remove from the freezer and dust with some extra cacao, top with some raw nuts or just eat as is.

Enjoy! xo


Monday, 30 March 2015

Raw Vegan Chocolate Ice Creams


The warm summer days are quickly coming to an end here in WA, but that's no reason not to indulge in a little frozen deliciousness especially when it tastes just so damn good! Oh, and they are also dairy free, gluten free and egg free. So there's that...

I am a confessed lover of banana 'nice cream' (see earlier posts here and here... and also a little bit of here) and recently I made the inevitable leap from giant bowls of the stuff to its more appropriately portioned pop stick form. 


Super quick. Super Easy. Super Dooper Delicious! 

All you need is a basic blender and a cheap popsicle mold you can pick up for a couple of dollars... and some similarly cheap pop sticks! 

Also, if you find you're having trouble getting the ice creams out of the moulds dip the bottom of the mold in a bowl of warm water just to start softening it (not so much that it melts though!) and they should be able to slide right on out. They are also fully customisable! Change up the flavour of the ice cream by adding berries, other fruits etc. and sprinkle them with whatever you little pixie hearts desire. I went with some chopped nuts this time but I'm already dreaming of rolling them in coconut... *drool*.


 **********
WARNING: THESE BAD BOYS MAY RESULT IN YOU LEARNING SOME DISTURBING FACTS ABOUT YOUR FRIENDS AND LOVED ONES. DISCOVERING THAT PERSONS (I.E. YOUR OWN MOTHER) ARE ICE CREAM 'BITERS' MAY RESULT IN INTENSE SHOCK, DISBELIEF AND THE FEELING THAT YOU MAY NEVER BE ABLE TO LOOK AT THEM THE SAME WAY AGAIN. DISCRETION IS ADVISED.
**********


Wednesday, 4 March 2015

Raw Vegan Cherry Ripe Tarts


I have to say this recipe has my Grandad written all over it!

For as long as I can remember he has been a cherry ripe fiend. It's almost a guarantee that you will find one slipped into every birthday, Christmas and fathers day present! Yet, somehow, we all still think we are being original sentimental...

This choc-coconut lust has been tempered in the last few years however with his development of type-2 diabetes, though god knows these fatty sugar bars probably won't be providing a whole heap of nutritional value to even the healthiest of individuals! A single 52g bar will give you almost 20% of your recommended daily fat intake and 30% of your recommended sugar intake! Not really surprising when their first ingredient listed is sugar (but clearly this doesn't make them sweet enough as it is soon followed by sweetened condensed milk and wheat glucose syrup... you get the picture).

Now don't get me wrong. I'm not on some fat-shaming, self-righteous mission to denounce those who indulge in such snacks. I'm more of a "you can eat whatever the hell you want with no judgement, just don't expect me to want to eat it too!" kind of person. I think if people are educated about what they are eating who am I to tell them what they can and cannot put in their bodies?!


Now in terms of what goes into MY body, well then I'm a little more pedantic. I don't enjoy most traditional 'treats'. Just going to put it out there. I hate the gross sugary feeling they leave in my mouth. I hate the sickly feeling they give my stomach. I just plain don't enjoy them. Give me a crunchy kale chip seasoned with fresh spices or a filling, protein packed raw bliss ball over a mars bar any day! God, I really am one of 'those' people aren't I?...

But if you have read my earlier posts (and I know you have HAVEN'T YOU?!) you will know that I enjoy taking inspiration from the folks at Cadbury and Mars and creating desserts which won't leave me rolling on the floor in a sugar coma. I've made individual raw 'Bounty Bar' bites and recently I remade my raw Snickers Slice for my coworkers who are notorious chocolate addicts but raved about my healthier interpretation. So, coming full circle, this time I decided to try my hand at Granddad's favourite Cherry Ripe, the result being individual tarts which are crammed with chocolaty, coconutty, cherry...y(?) deliciousness!

Oh, did I mention they are raw, vegan, gluten and dairy free? They are. You're welcome. 


Raw Vegan Cherry Ripe Tarts


For the Crust:

 4 Tbsp Coconut Butter
1/3 cup Cacao
1/2 cup Coconut Flour
20 Pitted Dates
1 cup Walnuts 
3 tbsp Coconut Oil

 For the Cherry Filling:

 1 cup Cashews, soaked overnight
1/2 cup Coconut Butter
1/2 cup Maple Syrup
1 tsp Vanilla
2 cups pitted Cherries
1/4 cup shredded Coconut (optional)
Extra water or non-dairy milk (optional)

  For the Chocolate Ganache:

3/4 cup Cashews, soaked overnight
1/3 cup Cacao
1/3 cup Maple Syrup
1 tsp Vanilla
1/3 cup Coconut Oil, melted  


To make the base simply throw everything in a food processor and blitz until you have a fine, wet crumb mixture. Press into the base of about 12 individual non-stick tart tins  (or you could make one large tart or slice) and freeze while you make the filling. 

For the cherry coconut filling, again, just stick everything in your food processor and blitz until the mixture is smooth and creamy. If you feel the mix is to thick and dry try adding some extra water or milk of your choice a little at a time until you have to consistency you want. If you want a more 'coconutty' taste you can add a little shredded coconut and stir it through the smooth mixture (this will also add a little extra texture if your that way inclined!).

Spoon the filling into your chilled tart bases, leaving a little room at the top for when you add your ganache, and stick back into the freezer for about 1/2 an hour or well chilled.

To make the ganache blitz the cashews in your food processor until fully chopped and fairly smooth. Add the remaining ingredients and process until the whole mix is totally smooth. 

Spoon the ganache onto the tarts and refrigerate until chilled and fully set.

Top with some extra chopped cherries, coconut or whatever else you want and enjoy! 


Monday, 29 September 2014


What the?! Two posts in two days! Craaaaazzzyyyy!

Shock and awe aside, today I decided to share with you two recipes for my current favourite breakfast option: Overnight Oats. 

Not only are these oats packed with fibre, protein and just plain delicious, but they are also so easy and convenient! I usually throw them together in a screw top jar before I go to bed and take them to work with me in the morning. No fuss or messing around when your trying to get out the door!

Now because variety is supposedly the spice of life, I have two different variations of these oats and I want you guys to let me know which you prefer!


PB + Heeyyyyy!


The first flavour is a little number I call PB + Heeyyyy! 
This is my usual go to simply because its super quick and easy. As you will see in the recipe below I like to use PB2 rather than normal peanut butter purely for the sake of calorie cutting but you can use the traditional version if you prefer (PB2 is essentially peanuts which have been roasted and had a lot of the oils removed so you have all the flavour but less of the fat ). Also, in the recipe I used almond milk but you could use coconut, soy, dairy, whatever you choose.


Carrot Cake-Walk

The second flavour is a little number I made up yesterday called Carrot Cake-Walk.
Basically I had seen versions of raw carrot cakes around the Internet and thought, why should your oats be missing all that carrot loving? Well no longer! Time for that great carrot cake sweetness to make the move to breakfast. 


Both sound pretty good right? So here is what you'll need:


Ingredients:


PB + Heeeyyy

1/3 cup Rolled Oats (or instant)
2 tbsp Chia Seeds
1 tbsp PB2 powder (or normal peanut butter)
2 tsp Sweetener (you can use stevia, natvia or even equal if you choose)
5 or so Pitted Dates, roughly chopped 
1 cup Almond Milk (or coconut, soy, dairy, whatever you like)
 

Carrot Cake-Walk

1/3 cup Rolled Oats (or instant)
2 tbsp Chia Seeds
1 small Carrot (shredded or blended in a food processor)
1/4 tsp Cinnamon
1/2 tsp Mixed Spice
1 heaped tbsp Shredded Coconut
2 tsp Sweetener (you can use stevia, natvia or even equal if you choose)
5 or so Pitted Dates, roughly chopped 
1 cup Almond Milk (or coconut, soy, dairy, whatever you like)


The process is exactly the same for both, simply stick everything into a jar, stir or shake to make sure it is all well combined and stick in the refrigerator overnight. Voila! 


So now you all know how simple it is go and test out these wonder jars of oaty-goodness and let me know which flavour you think comes out on top. Though lets face it, when your eating these babies, everyones a winner!


Friday, 15 August 2014

Raw Snickers Slice *Updated*


*Update: I have made a couple of adjustments to this recipe and added some new (somewhat more asthetically pleasing) photos!*


First of all, sorry about the terrible photos! It was about 7pm when I took them and I suffer from a serious lack of good lighting in my house! That and I was running out the door to share these babies with my work friends...

However, one mouthful of this delicious, nutty slice and I'm sure all poor image quality will be forgiven...Its a freaking Snickers Slice which is actually good for you for Pete sake!


I actually came across this recipe from LiveLoveEatRaw on Instagram and knew there was no way I could resist trying it. I dare you to try! On second thought, no I don't. You really should try it. Right now.


I did make a couple of changes to the original recipe but you can follow whichever suits the ingredients you have on hand. Winner winner chicken dinner! 

**Just note, technically maple syrup isn't raw so if you are following a strict raw diet I would use rice malt syrup as a substitute as in the original recipe**


Raw Snickers Slice

You Will Need


For the Base:

1 cup almond meal
1 cup coconut flour
3 tbsp maple syrup
1/4 cup melted coconut oil
3 tbsp 100% natural peanut butter
1 tsp vanilla bean or extract
Pinch of salt 

For the Peanut Caramel Filling

3 cups pitted dates
1/3 cup coconut oil, melted
4 tbsp 100% natural peanut butter
1 tsp salt

Chocolate Topping

1/4 cup cacao powder
1/4 cup maple syrup
1/3 cup coconut oil
1.2 tsp vanilla extract
1/3 cup crushed peanuts 


Start by chucking all of the base ingredients into a food processor and blending until totally combined then spoon into a 20cm square baking tin lined with non-stick paper and press firmly so it is totally flat. Pop the tin in the freezer.

To make the caramel filling roughly chop the dates and then place in your food processor with the remaining filling ingredients and process until combined. At first it will look like it's not coming together but just be patient and keep on blitzing! When it's ready spoon over top of the chilled base and flatten down. Stick it back in the freezer while you make the topping.

In a mixing bowl whisk all of the topping ingredients except for the crushed nuts until they come together to form a delicious chocolate ganache. Pour over top of the chilled filling and gently shake the tin to make sure it is fully spread out and smooth. Sprinkle with the chopped nuts and stick back in the freezer or the fridge until set and firm.


 VOILA! Enjoy each mouth full of salty, sweet goodness! xo


Monday, 7 July 2014


Be it brought on by 'that time of the month', a bad breakup or a good old sweet tooth; sometimes you crave the sweet things in life. Often times this involves ice cream. 

But should we let these cravings ruin all our hard work in the gym for a few minutes of sugar-induced satisfaction?! Will you be regretting every mouthful as soon as you down the spoon?!

There is only one thing we say to gym-defying deserts: Not Today! 

What up Game of Thrones reference!


What you should have instead is a serving of 'Nice Cream', a healthy ice cream alternative sweeping rawists, vegans and the hippy instagram community. 


As the name suggests, this 'desert' is both delicious and nutritious! 

The ice cream is simply frozen banana blitzed in a food processor and layered with whatever fruits, nuts and flavours your sensible-yet-hungry heart desires.


Banana, Date and Coconut 'Nice Cream' 


You Will Need: 

3 Bananas
Handful of pitted dates
Large handful of dried, flaked coconut
Large handful of raspberries (or blueberries, chopped strawberries etc.)
Handful of pecans (or another type of nut)


Peel and slice the bananas into bite sized pieces and place on a tray lined with baking paper. Stick in the freezer for an hour or so until the banana slices are well frozen. 

Blitz the frozen banana in your food processor for about 10 minutes or until it becomes smooth and creamy (don't worry if it just looks chunky at first, just keep blending!). If the banana is too soft stick it in the freezer for 10 min or so until it firms up a little.
Grab your most hipster-ish mason jar and spoon a little nice cream into the bottom. Add a layer of berries, nuts, dates and coconut and continue filling your jar, alternating between banana and the flavourings. 

Voila! 

Enjoy your sweet fix guilt free!


Thursday, 5 June 2014


Feeling a little sluggish?

Having sweet cravings but don't want to blow those crunches, lunges, squats and (God help you!) burpees?

Never fear! I bring to you yet another raw slice recipe which is all natural, vegan, dairy and gluten free, full of protein and iron and its just all round drool-worthy.


I have previously posted a recipe for a Raw Choc Mint Slice (here) and, though it too is delicious and nutritious, I wanted to have a go at tweaking the recipe to include fresh mint and greens. Let me tell you, this was a wise decision!


Though both slices taste quite similar, I found that adding fresh mint and spinach gave the filling an amazing green colouring and the taste of the real mint gives it a really fresh and natural... almost earthy taste. Maybe 'earthy' isn't the right word... just trust me on this one!


Also, a side hobby of mine is video editing and I thought what better way to combine my interests than to create a recipe video tutorial for you lovely people! So enjoy and let me know what you think!


RAW CHOC MINT SLICE 2.0


For the Base:


4 Tbsp Coconut Butter
1/3 cup Cacao
1/2 cup Coconut Flour
20 Pitted Dates
1 cup Walnuts


For the Filling:

One Bunch of Mint
Large handful of Baby Spinach
1 cup Cashews, soaked overnight
1/2 cup Coconut Butter
1/2 cup Maple Syrup
1 tsp Vanilla 
1/2 tsp Peppermint Extract 


For the Topping:

3/4 cup Cashews, soaked overnight
1/3 cup Cacao
1/3 cup Maple Syrup
1 tsp Vanilla
1/3 cup Coconut Oil, melted


To make the base, blend all ingredients in a processor and press into the base of a 20cm square tin lined with baking paper. Stick in the freezer until firm and set.


To make the filling, again blend all ingredients in a processor until the mixture is almost smooth (the greens should be all chopped) and pour over the top of the frozen base. Smooth with a spatula or palette knife and put back in the freezer for at least an hour to set.


To make the topping, process all ingredients until smooth and pour over the top of the bottom two layers, smooth and then freeze until the entire slice is set and firm.


Slice up and enjoy!


Friday, 20 December 2013

Relish the Thought!


The pre-Christmas rush has well and truly set in so just a quick post this afternoon!

In addition to my Citrus Sea Salt, Christmas Rocky Road and Fruit Mince Tarts; featuring in my Christmas gift guide this year in this deliciously spicy Eggplant Relish!


Enjoy it alongside a platter or cheese and biscuits or simply spread it on a slice of crusty bread, whatever takes your fancy!

Whats more, it couldn't be easier to make! Simply throw your ingredients into a pot and let the stove do the rest. Now thats my kind of recipe!


Spicy Eggplant Relish


Adapted from this recipe at taste.com.au
Makes about 4 cups


2 large eggplants, cut into 2cm cubes
2 tbsp salt
2 small red capsicums, deseeded and cut into 2cm pieces
250g brown onions, cut into thin wedges
10 fresh pitted dates, roughly chopped
500ml white wine vinegar
250g brown sugar
A long red chili, sliced
3 garlic cloves, peeled and chopped
4 tsp cumin seeds


Place the eggplant in a large colander and sprinkle with the salt. Toss to combine and allow the colander to stand in a sink for an hour. Rinse well to get off any excess salt and pat dry with a paper towel

Combine the eggplant with all of the remaining ingredients in a large saucepan and cook over a high heat, stirring until the mixture comes to the boil and the sugar has dissolved.

Simmer, stirring regularly, with the lid off for 2 hours or until all the excess liquid has evaporated and the mixture is thick.  Remove from the heat and allow to stand for 2-3 minutes before spooning into steralized jars.


Sunday, 20 October 2013

Raw Spiced 'Cream' Tart


Being the type of person I am, I love a challenge!

From solving basic maths problems to becoming unreasonably serious and competitive during quiz nights... I love it all!

Segwaying in seamlessly, being a bit of a health food nut I love the challenge that comes with taking traditional foods and transforming them into more 'skinny jean-friendly' versions. Take for example this Spiced Ricotta and Nectarine Tart. I have made this recipe on a number of occasions and love the flavour combination of the creamy ricotta and the spices. What I don't love is the amount of refined sugar and fats it contains.


Solution: The Raw Spiced Cream Tart!


No it doesn't actually contain any dairy cream; it is in fact and gluten dairy free, vegan and totally delicious!

Taking the basic flavours from the original dish I swapped out the butter-loaded pastry and sugary ricotta filling and instead used a wheat free base of raw nuts and fruit and a cashew cream filling. A few adjustments here and there and I was left with a delicious treat which is light, not overly sweet and is missing none of the creaminess of its predecessor!


Raw Spiced Cream Tart


For the base: 

1 cup pitted dates
1/2 cup raw almonds
1/2 cup raw walnuts
1/2 cup raw cashews
2 tbsp sunflower seeds 


For the Filling:
 
1 1/2 cups raw cashews, soaked overnight
1/4 cup almond milk (or other nut milk)
1 1/2 tsp vanilla extract
2 tsp ground cinnamon
2 tsp ground ginger
1 tsp ground cardamon
2 tbsp maple syrup


To make the base blitz the base ingredients in a food processor until everything is well chopped and the mixture will stick together when squeezed in your fingers. Press the base into a large tart tin or several individual sized tins and put in the freezer.

To make the filling blitz the cashews in a food processor until it forms a paste and gradually add the milk, blending until the mixture is smooth and creamy. Add the remaining ingredients and blitz again until everything is combined.

Spoon the filling into the chilled tart bases and smooth the tops. Refrigerate for an hour to chill and then decorate with a drizzle of maple syrup, a sprinkle of nuts or anything else you like!


Tuesday, 15 October 2013

I Scream, You Scream...


We all scream for ice cream!

Yes, the dessert favoured by children and heartbroken, chick flick watchers is something with worldwide appeal. The perfect snack on a hot summer day... unless you are lactose intolerant or wanting to watch your weight.

If like me you fall into either of these latter exceptions I have the perfect alternative to a creamy, sugary cone. So move over Mr. Whippy. Hit the road Baskin and Robin! There is a new dairy free, raw "ice cream" in town.

The Raw Nutty- Choc Ice Cream


No it is not technically ice cream... what with having no cream in it at all... but it is the next best thing! 

Some may even go so far as to say it is BETTER (*gasp*) given the lack of binge's remorse it induces, leaving you with nothing but a full tummy and a plan to make another batch straight away 


 Raw Nutty-Choc Ice Cream

Makes one small tub  
1 cup raw cashews, soaked overnight
2 cups unsweetened almond milk (or water)
20 pitted dates
6 tbsp cacao powder
2 bananas, frozen and chopped

Extra dates and raw cashews, chopped.

 
Soak the dates in the almond milk for 15min. 
 
Process the cashews in a food processor until as smooth as possible and then add the dates, almond milk and banana pieces . Process until the mixture is smooth and as lump free as possible.
Add the cacao powder and process until the mixture is combined.

Chill the mixture and then churn in an ice cream maker according to the manufacturer's instructions. Once churned stir in the extra dates and nuts and pour into a plastic container
Freeze the ice cream until its ready to be eaten (you may want to let it thaw for about 10 minutes before eating it though)


And that's it!


Sunday, 6 October 2013

The Raw Roadtip Rampage


Since I started delving into the raw food phenomenon I have been getting requests to turn the usual calorie ladened foods into healthier versions of themselves. In particular my sister (not so subtly) hinted that I try recreating something of the choc-mint variety - her all time favourite flavour combination!

As luck would have it I was taking a road trip to Jurien Bay for the long weekend and my fellow car-poolers were also right on board with raw eating (though with the amount of alcohol consumed that weekend I don't think anyone went home feeling particularly healthy...).

 Road trip food was required.

Enter the Raw Choc Mint Slice!


Now, having made a few raw snacks and treats lately, I thought I had fully appreciated how good raw food could be. I was wrong. Very, very wrong!

This slice took healthy snacking to a whole new level! Rich, filling, minty, creamy, nutty, chocolaty... safe to say there were multiple orgasms in my mouth that day. I can remember it so clearly... the crunchy base... the creamy centre with a smacking of mint... the rich chocolate topping which just melts in your mouth... *insert Homer Simpson drool face here!* 


I spent a good while scouring the Internet looking at other's recipes for tips and inspiration and happened to stumble across this one from Ascention Kitchen which I just couldn't go past (FYI this blog is going to be a regular stop for me from now on!).

I used their recipes as a basic guide and them made a few changes to suit myself and the ingredients I had on hand. Where they used pure coconut oil I used homemade coconut butter instead (to make it yourself follow this recipe). Not that this makes a huge difference but, healthy or not (seriously the debate raging over this is fierce!), coconut oil is still a calorie dense fat and so I try to avoid using it in large quantities where possible. Also, I decided to use soaked almonds in my minty filling. If you want a more 'purely white' look to your filling you could sit and peel the almonds before adding them but personally I have no patience for that business and if your paying an arm and a leg for nuts why not get all the nutrients you have from them, including those in their skins??!!

Any who, try this recipe, fall into a food coma for a few hours, and then come back and let me know what you think!


Raw Choc Mint Slice

*Makes about 12 slices* 


For the Base:

1/2 cup coconut flour
1/2 cup raw cashews
1/2 cup raw walnuts
1/4 cup cacao
20 dried dates
4 (heaped) tsp coconut butter


For the Mint Filling:

1 cup raw almonds, soaked overnight
3/4 cup coconut butter
1/2 cup pure maple syrup
1 tsp vanilla extract
1/2 tsp peppermint essence


For the Chocolate Topping:

3/4 cup almonds, soaked overnight
1 tsp vanilla extract
1/3 cup cacao
1/3 cup coconut oil, melted
1/3 cup + 1 tbsp maple syrup


To Make The Base:

Blitz all of the base ingredients in a food processor until well chopped and the mixture starts to come together. Line a 20cm x 20cm square pan with baking paper and press the mixture into the base until flat and even. Stick it into the freezer whilst you prepare the filling.


To Make The Filling:

Drain the almonds from their soaking liquid and blitz with the remaining filling ingredients until the mixture in almost smooth. Spoon the mixture onto the base and smooth with a spatula or palette knife until even and flat. Place the pan back into the freezer and leave until the filling is set (at least one hour!).


To Make The Chocolate Topping:

Blitz the almonds in a food processor until finely chopped and then add the remaining ingredients and blend until the mixture is runny and as smooth as possible. Pour over the chilled filling and smooth with a knife. Place back into the freezer and leave until the topping is chilled and set.


Remove the slice from the pan and use a sharp knife to slice into individual pieces.

Enjoy! xo 


Monday, 16 September 2013

The Max Power Bar


Nobody snuggles with Max Power. You strap yourself in and feel the G's!

Homer Simpson (A.K.A Max Power)


First of all, if you don't recognise the above quote get out! We cannot be friends!
Just kidding... but seriously, educate yourself...

Secondly, like Homer's hairdryer-inspired moniker, I too was looking for a name which would reflect the energy boosting, hunger fighting, Apocalypse defying powers of my latest kitchen experiment. Ok, maybe not that last one, but they're still pretty good!


Presenting the Max Power Bar


Not only are they delicious but they are also gluten free, dairy free and use only natural fats and sugars. 

When making these I was casually throwing things into a food processor and began to wonder how they would turn out if I used different 'cooking' methods. Being the curious type I split the final mixture into three separate batches. 

One I simply put in the fridge and allowed it to set that way. 
The second I baked in the oven.
As a happy compromise, for the third batch I left it in a 40 degree C oven for a couple of hours.

I am pleased to announce that all three techniques worked perfectly so this recipe is perfectly fine for those sticking with a raw diet. You can simply use the first or third method and you are still within the rules (alternatively instead of using a low set oven you could use a dehydrator).

I have to admit that I slightly preferred those which had been baked at a higher temperature. They were still chewy and soft like the other two but had the added bonus of a slightly crisp topping. But each to their own! 

One more thing. Not only are these bars quick and easy to make but you can also throw in whatever nuts, seeds, fruits you have lying around! Sesame seeds, gogi berries, dried blueberries, pineapple pieces... you are only limited by your imagination (and your budget...)!


The Max Power Bar


1 cup pitted dates
1 cup dried apricots
1/2 cup raw almonds
1/2 cup raw walnuts
1 cup mixed seeds (I used sunflower seeds and pepitas)
1/2 cup shredded coconut
1 cup quinoa flakes (could alternatively use rolled oats for a non-GF version)
2 tsp cinnamon
1/2 cup pure honey
1/3 cup unhulled tahini
1/3 cup dried cranberries 
1/4 cup dessicated coconut 


In a food processor blend the dates, apricots, almonds and walnuts until well chopped and coming together into a sticky mix.

Add all of the remaining ingredients except for the dessicated coconut and blend until it is all combined. 

Line a baking dish with non-stick paper (the size you use will depend on how dense you want your bars but I would recommend a 30cm x 20cm pan) and press the mix firmly into the tray. Sprinkle with the dessicated coconut and lightly press it into the mix.

Next part is really up to you: 

1. You can refrigerate the dish for at least an hour or until it sets,
2. You can bake it in an oven set to 180 degrees C for 15min or until lightly browned on top, or
3. You can put it in a food dehydrator or an oven set to 40 degrees C for 5 hours    

If you use either the second or third method allow the mixture to cool completely to room temperature before slicing it up.

Enjoy! XO 

Nobody snuggles with Max Power. You strap yourself in and feel the G's. - See more at: http://www.planetclaire.org/quotes/simpsons/season-ten/#Homer_to_the_M
Nobody snuggles with Max Power. You strap yourself in and feel the G's. - See more at: http://www.planetclaire.org/quotes/simpsons/season-ten/#Homer_to_the_Max

Tuesday, 10 September 2013

Let the Rawsome Roll On!


So not 24 hours ago I posted a recipe for some Rawsome Bliss Balls and after receiving many positive comments I decided to keep the health ball rolling (see what I did there!).

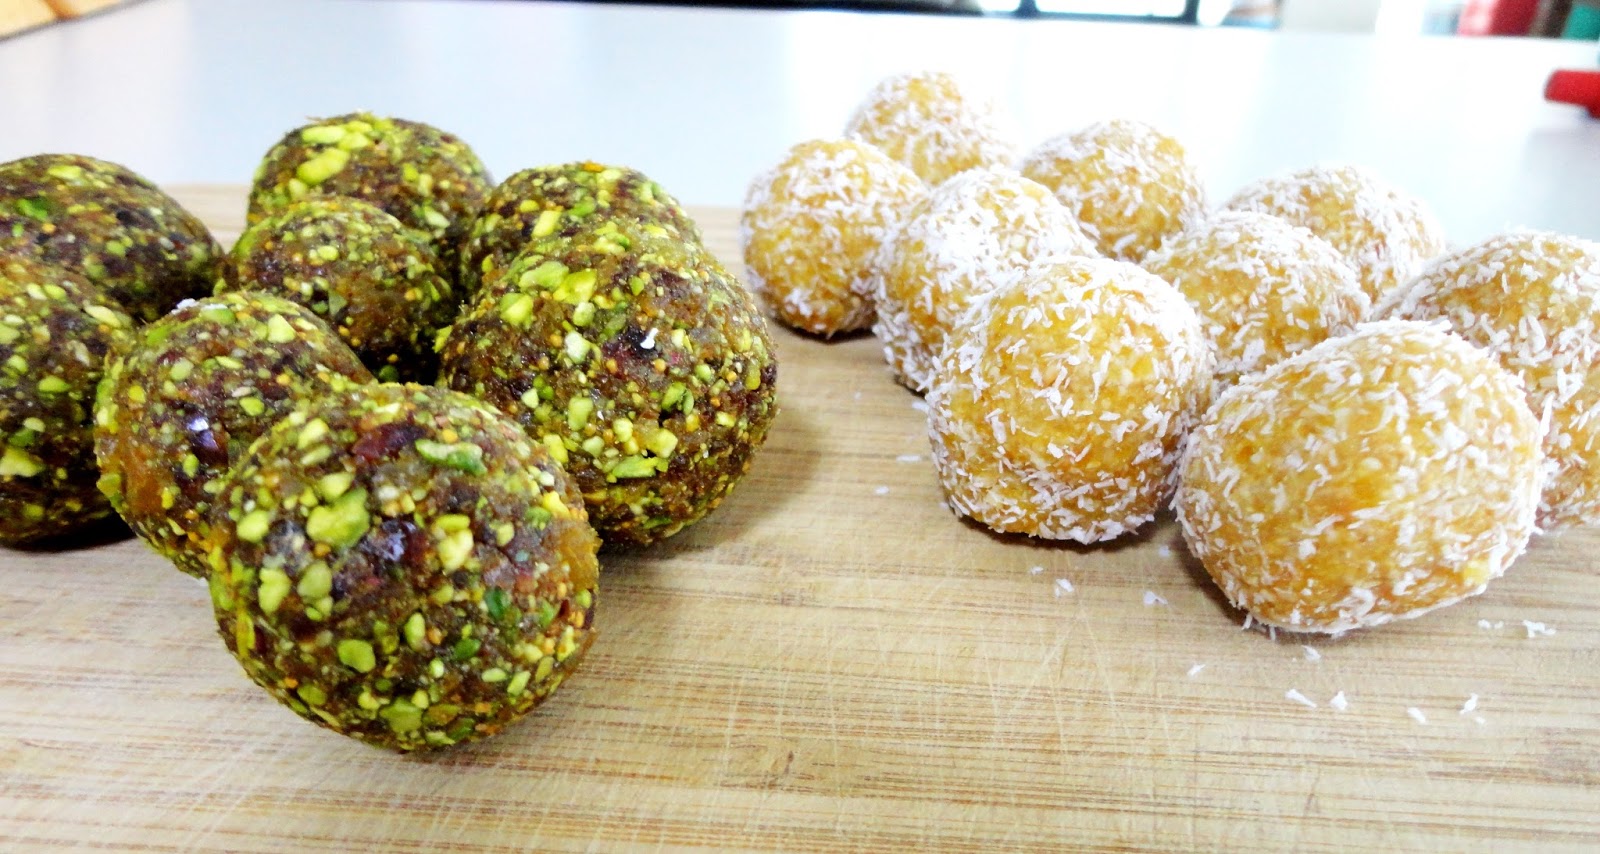
As it so happens my sister is flying out for work tomorrow and was after some healthy snack ideas to take away with her. Cue an excited me! I raided my kitchen for whatever nuts and fruits I had lying around and upon spying my bottles of rose and orange-blossom water, decided we were taking a trip to the Middle East (or at least in that general flavour-inspired direction!).

Here are a couple of new flavour combinations I came up with which are both delicious but are also  raw, so all you Rawsome people rejoice!

Wow. These terrible puns are making even me want to punch myself...


Figgy-Orange Bliss Balls


Ingredients:

1/2 cup Pitted Dates
4 Dried Figs
1/2 cup Dried Apricots 
1/2 cup Pistachios 
1 tsp Orange-Blossom Water 


Method:

Blitz all the ingredients in a food processor until well chopped. Mould into small, walnut sized balls with your hands and refrigerate until firm. 


Apricot and Coconut Bliss Balls


Ingredients:

1/2 cup Dried Apricots 
1 cup Cashews
1/4 cup Dessicated Coconut, plus extra to roll in
1 tsp Rose Water
1/2 tsp Orange-Blossom Water 


Method:


Blitz all the ingredients in a food processor until well chopped. Mould into small, walnut sized balls with your hands, roll them in extra coconut

and refrigerate until firm.