Showing posts with label slice. Show all posts

Friday, 27 November 2015

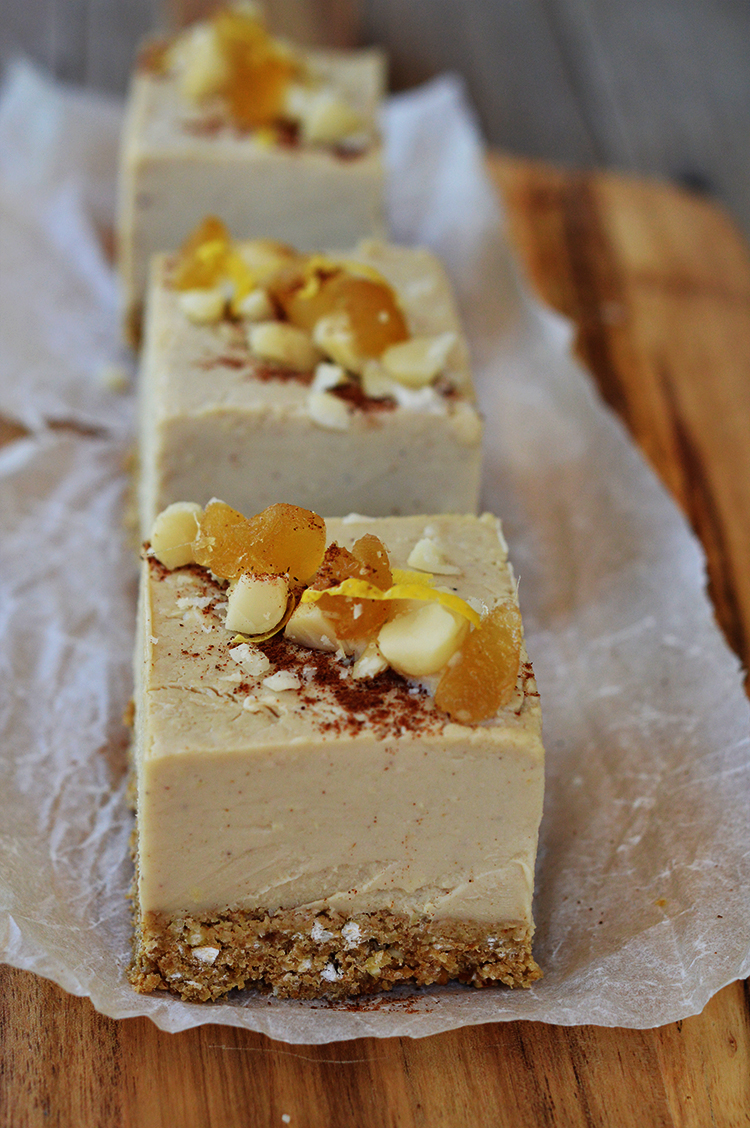
Lemon and Ginger Raw Cheesecake Slice


This cheesecake is a bit of an homage to my lovely mother (aka. 'Love Chunks', aka 'Mother Bean' etc.). Lemon and ginger are two of her favourite flavours and being the conniving little scamp that I am I decided to use this to my advantage in my life quest to 'hippify' her.

Throw a bunch of ginger and lemon into a sweet and creamy filling, spoon it onto a crispy but also chewy base (also dusted with ginger) and let the magic happen... mwahahaha how could she resist?!

I am actually also a huge fan of lemon and ginger, especially in the summer where the flavours and a bit lighter and more refreshing than something like chocolate. This slice is very rich given the high nut/fat content but it is also sweet, tart and refreshing - the perfect snack for a summer afternoon! 


Give it a go and let me know what you think!


Lemon and Ginger Cheesecake Slice


Makes between 12-16 serves


For the Base:

1 1/4 cup oats
1 cup desiccated coconut
1 cup pitted dates
1 tsp vanilla extract
2 tbsp maple syrup
2 tsp ground ginger
1/2 buckwheat grouts
1 tbsp coconut oil


For the Filling:

4 cups raw cashews, soaked overnight in water (don't discard the water!)
2 tsp vanilla extract
1/4 cup maple syrup
zest and juice of 1 lemon
2 cm piece of ginger, peeled and finely grated
1/2 tsp mixed spice (optional)


To make the base simply throw all the ingredients in a food processor and blend until becomes combined and dough-like. Press into the base of a square 20cm tin lined with non-stick paper and refrigerate while you make the filling.

For the filling, wipe out your food processor and blend all the filling ingredients. If you think the mixture is to thick add a some of the cashew soaking water (or normal water if you forgot to save it...) until you get the right consistency. It should be thick and stick to you spoon but also loose enough to be spreadable. 

Pour over the top of the chilled base, smooth the top and refrigerate until set. 

Eat as it is or decorate with lemon rind, glace ginger, raw nuts or whatever else tickles your fancy! 


Friday, 15 August 2014

Raw Snickers Slice *Updated*


*Update: I have made a couple of adjustments to this recipe and added some new (somewhat more asthetically pleasing) photos!*


First of all, sorry about the terrible photos! It was about 7pm when I took them and I suffer from a serious lack of good lighting in my house! That and I was running out the door to share these babies with my work friends...

However, one mouthful of this delicious, nutty slice and I'm sure all poor image quality will be forgiven...Its a freaking Snickers Slice which is actually good for you for Pete sake!


I actually came across this recipe from LiveLoveEatRaw on Instagram and knew there was no way I could resist trying it. I dare you to try! On second thought, no I don't. You really should try it. Right now.


I did make a couple of changes to the original recipe but you can follow whichever suits the ingredients you have on hand. Winner winner chicken dinner! 

**Just note, technically maple syrup isn't raw so if you are following a strict raw diet I would use rice malt syrup as a substitute as in the original recipe**


Raw Snickers Slice

You Will Need


For the Base:

1 cup almond meal
1 cup coconut flour
3 tbsp maple syrup
1/4 cup melted coconut oil
3 tbsp 100% natural peanut butter
1 tsp vanilla bean or extract
Pinch of salt 

For the Peanut Caramel Filling

3 cups pitted dates
1/3 cup coconut oil, melted
4 tbsp 100% natural peanut butter
1 tsp salt

Chocolate Topping

1/4 cup cacao powder
1/4 cup maple syrup
1/3 cup coconut oil
1.2 tsp vanilla extract
1/3 cup crushed peanuts 


Start by chucking all of the base ingredients into a food processor and blending until totally combined then spoon into a 20cm square baking tin lined with non-stick paper and press firmly so it is totally flat. Pop the tin in the freezer.

To make the caramel filling roughly chop the dates and then place in your food processor with the remaining filling ingredients and process until combined. At first it will look like it's not coming together but just be patient and keep on blitzing! When it's ready spoon over top of the chilled base and flatten down. Stick it back in the freezer while you make the topping.

In a mixing bowl whisk all of the topping ingredients except for the crushed nuts until they come together to form a delicious chocolate ganache. Pour over top of the chilled filling and gently shake the tin to make sure it is fully spread out and smooth. Sprinkle with the chopped nuts and stick back in the freezer or the fridge until set and firm.


 VOILA! Enjoy each mouth full of salty, sweet goodness! xo


Thursday, 5 June 2014


Feeling a little sluggish?

Having sweet cravings but don't want to blow those crunches, lunges, squats and (God help you!) burpees?

Never fear! I bring to you yet another raw slice recipe which is all natural, vegan, dairy and gluten free, full of protein and iron and its just all round drool-worthy.


I have previously posted a recipe for a Raw Choc Mint Slice (here) and, though it too is delicious and nutritious, I wanted to have a go at tweaking the recipe to include fresh mint and greens. Let me tell you, this was a wise decision!


Though both slices taste quite similar, I found that adding fresh mint and spinach gave the filling an amazing green colouring and the taste of the real mint gives it a really fresh and natural... almost earthy taste. Maybe 'earthy' isn't the right word... just trust me on this one!


Also, a side hobby of mine is video editing and I thought what better way to combine my interests than to create a recipe video tutorial for you lovely people! So enjoy and let me know what you think!


RAW CHOC MINT SLICE 2.0


For the Base:


4 Tbsp Coconut Butter
1/3 cup Cacao
1/2 cup Coconut Flour
20 Pitted Dates
1 cup Walnuts


For the Filling:

One Bunch of Mint
Large handful of Baby Spinach
1 cup Cashews, soaked overnight
1/2 cup Coconut Butter
1/2 cup Maple Syrup
1 tsp Vanilla 
1/2 tsp Peppermint Extract 


For the Topping:

3/4 cup Cashews, soaked overnight
1/3 cup Cacao
1/3 cup Maple Syrup
1 tsp Vanilla
1/3 cup Coconut Oil, melted


To make the base, blend all ingredients in a processor and press into the base of a 20cm square tin lined with baking paper. Stick in the freezer until firm and set.


To make the filling, again blend all ingredients in a processor until the mixture is almost smooth (the greens should be all chopped) and pour over the top of the frozen base. Smooth with a spatula or palette knife and put back in the freezer for at least an hour to set.


To make the topping, process all ingredients until smooth and pour over the top of the bottom two layers, smooth and then freeze until the entire slice is set and firm.


Slice up and enjoy!


Thursday, 13 February 2014

Allsorts of Delicious


Licorice.

You either love it or hate.

If you are one of those fabulous people who appreciate this dark and sultry sweet, then this could be the slice for you!


A long time ago (in a dining room far, far away!) I made this slice for a friend to serve when she had some friends over for as coffee. One of her guests fell in love with this treat and has raved about it ever since. So when said Guest's birthday approached my friend asked me to once again whip up the dish as a birthday surprise. How could I possibly refuse?!

So here you go, the apparently famous Licorice Allsort Slice! 


Licorice Allsort Slice


Makes ~20 pieces


125g butter, chopped
2/3 cup sweetened condensed milk
2 tbsp golden syrup
250g plain sweet biscuits
1/2 cup dessicated coconut
375g licorice allsorts, roughly chopped
375g dark cooking chocolate, chopped
30g copha (vegetable shortening)


Place the butter, condensed milk and golden syrup in a small saucepan and cook, stirring over a low heat until the butter in fully melted and the mixture is smooth and combined. Remove from the heat and set aside for 10 minutes to cool.

Using a food processor to crush the biscuits into a breadcrumb consistency and place in a medium sized mixing bowl along with the coconut and licorice. Add the melted butter mixture and stir until combined.


Line a 20x30cm baking dish with non-stick paper and press the mixture into the base of the dish. Refrigerate for 30min to set.

Using either a bain marie or a microwave, melt the chocolate and copha together until totally smooth and combined. Pour the mixture over the chilled biscuit base and either tilt the dish or use a spatula to smooth the chocolate and ensure the base is totally covered. Refrigerate for a further 30min or until the chocolate layer has set firm.


Remove the slice from the baking dish and use a hot, sharp knife to cut it into individual pieces.

Enjoy!


Wednesday, 11 December 2013

On the 12th Day of Christmas...


Ok, so there are actually 14 days until Christmas, but whose counting?!


In my last post I shared my recipe for Fruit Mince Tarts so, sticking with the Christmas spirit, this time around I'm bringing you a super delicious recipe for seasonal Rocky Road.

What makes it 'seasonal' you ask? Well swap your traditional crushed biscuits for gingerbread, trade those dried fruits for glace cherries and add a smack of brazil nuts and you have yourself a delicious slab of chocolate-coated Christmas spirit!


This recipe is actually based on this one from the ever-fabulous Nigella Lawson, with a few small changes. I don't think she will mind though... look at that smile!


Christmas Rocky Road 


Makes about 16 pieces (depending on how greedy your slices are cut!) 


250g dark chocolate
250g milk chocolate
175g butter
1/2 cup golden syrup
150g Brazil nuts, roughly chopped
150g red glace cherries
125g mini marshmallows
200g crushed gingerbread


For The Gingerbread  

65g butter
1/4 cup golden syrup
1/4 cup brown sugar
1 egg yolk
1 tbsp ground ginger 
2 tsp mixed spice
1/2 tsp bicarb soda
1 1/4 cups self-raising flour


*Note: this gingerbread is quite spicy because you still want the full flavour effect when its broken into small chunks and mixed with the other slice ingredients but you can adjust it as you see fit. It also makes more than is required for this recipe but that just means you have a delicious snack to munch on while the slice is setting!*


To Make the Gingerbread:


Place the butter, golden syrup and brown sugar in a saucepan and melt over a low/medium heat, constantly stirring, until totally melted and combined. Set the mix aside for 30min to cool.


Place the dry ingredients in a mixing bowl and stir to combine them. Stir the egg yolk into the butter mixture and then add it all to the dry mix.

Stir everything together until it forms a soft dough and use your hands to roll it into balls (about three-times the size of a golf ball) and flatten onto a baking tray lined with non-stick paper, leaving a 3cm gap between each disk. 


Bake at 180 degrees Celsius for 12 minutes then remove from the oven and allow to cool on the baking tray for 5 minutes. Move to a cooling rack and allow to cool completely. 


For the Rocky Road:


Line the base and sides of a 20cm square cake tin with baking paper.

Place the chocolates, butter and golden syrup in a heatproof mixing bowl and microwave in 30 second bursts, stirring each time, until the mixture in totally melted and combine.


Roughly crumble the gingerbread into small chunks and add to the chocolate mixture along with the nuts, cherries and marshmallows. Stir to combine and spoon the mix into the prepared cake tin. 

Refrigerate for at least an hour or until set and firm.

Remove the slice from the tin and slice into small squares.


If you wish, decorate with a sprinkle of icing sugar and serve to your adoring friends and family, or wrap in cellophane bags to make the perfect gift! 


  XXOO


Sunday, 6 October 2013

The Raw Roadtip Rampage


Since I started delving into the raw food phenomenon I have been getting requests to turn the usual calorie ladened foods into healthier versions of themselves. In particular my sister (not so subtly) hinted that I try recreating something of the choc-mint variety - her all time favourite flavour combination!

As luck would have it I was taking a road trip to Jurien Bay for the long weekend and my fellow car-poolers were also right on board with raw eating (though with the amount of alcohol consumed that weekend I don't think anyone went home feeling particularly healthy...).

 Road trip food was required.

Enter the Raw Choc Mint Slice!


Now, having made a few raw snacks and treats lately, I thought I had fully appreciated how good raw food could be. I was wrong. Very, very wrong!

This slice took healthy snacking to a whole new level! Rich, filling, minty, creamy, nutty, chocolaty... safe to say there were multiple orgasms in my mouth that day. I can remember it so clearly... the crunchy base... the creamy centre with a smacking of mint... the rich chocolate topping which just melts in your mouth... *insert Homer Simpson drool face here!* 


I spent a good while scouring the Internet looking at other's recipes for tips and inspiration and happened to stumble across this one from Ascention Kitchen which I just couldn't go past (FYI this blog is going to be a regular stop for me from now on!).

I used their recipes as a basic guide and them made a few changes to suit myself and the ingredients I had on hand. Where they used pure coconut oil I used homemade coconut butter instead (to make it yourself follow this recipe). Not that this makes a huge difference but, healthy or not (seriously the debate raging over this is fierce!), coconut oil is still a calorie dense fat and so I try to avoid using it in large quantities where possible. Also, I decided to use soaked almonds in my minty filling. If you want a more 'purely white' look to your filling you could sit and peel the almonds before adding them but personally I have no patience for that business and if your paying an arm and a leg for nuts why not get all the nutrients you have from them, including those in their skins??!!

Any who, try this recipe, fall into a food coma for a few hours, and then come back and let me know what you think!


Raw Choc Mint Slice

*Makes about 12 slices* 


For the Base:

1/2 cup coconut flour
1/2 cup raw cashews
1/2 cup raw walnuts
1/4 cup cacao
20 dried dates
4 (heaped) tsp coconut butter


For the Mint Filling:

1 cup raw almonds, soaked overnight
3/4 cup coconut butter
1/2 cup pure maple syrup
1 tsp vanilla extract
1/2 tsp peppermint essence


For the Chocolate Topping:

3/4 cup almonds, soaked overnight
1 tsp vanilla extract
1/3 cup cacao
1/3 cup coconut oil, melted
1/3 cup + 1 tbsp maple syrup


To Make The Base:

Blitz all of the base ingredients in a food processor until well chopped and the mixture starts to come together. Line a 20cm x 20cm square pan with baking paper and press the mixture into the base until flat and even. Stick it into the freezer whilst you prepare the filling.


To Make The Filling:

Drain the almonds from their soaking liquid and blitz with the remaining filling ingredients until the mixture in almost smooth. Spoon the mixture onto the base and smooth with a spatula or palette knife until even and flat. Place the pan back into the freezer and leave until the filling is set (at least one hour!).


To Make The Chocolate Topping:

Blitz the almonds in a food processor until finely chopped and then add the remaining ingredients and blend until the mixture is runny and as smooth as possible. Pour over the chilled filling and smooth with a knife. Place back into the freezer and leave until the topping is chilled and set.


Remove the slice from the pan and use a sharp knife to slice into individual pieces.

Enjoy! xo